ingridscience

Smells in the air demonstration

Summary
Peel an orange behind a screen and ask students when they smell something new.
Science topic (2005 curriculum connection)
Life Science: Human Body (grade 5)
Physical Science: Chemistry (grade 7)
Materials
  • an orange
  • a screen hide the orange from students e.g. poster board/chart stand
Procedure

Hide the orange behind the screen, so that students do not see it before the activity.

Start to peel the orange behind the screen and ask students to raise their hand when they can identify the smell that is floating their way.
Note that people's sense of smell differs widely, so some students will smell and recognize it quite quickly, and others may have trouble identifying it. Do not require that everyone smells the orange before revealing what it is.

Explain that smells are small molecules moving through the air. (The main molecule that makes orange smell is called limonene.)
It takes a while for the smell molecules to be carried on air currents away from the orange, hence the students nearer the orange will smell it first.
Once the odour molecule reaches your nose, they fit onto larger receptor molecules on the lining of your nose, which sends a signal to your brain. Only when it reaches your brain is it interpreted as a smell.

Grades taught
Gr 1
Gr 2
Gr 3
Gr 4
Gr 5

Energy forms and transformation

Summary
Explore different forms of energy and energy transformations through a selection of activities.
Procedure

Forms of energy to cover:
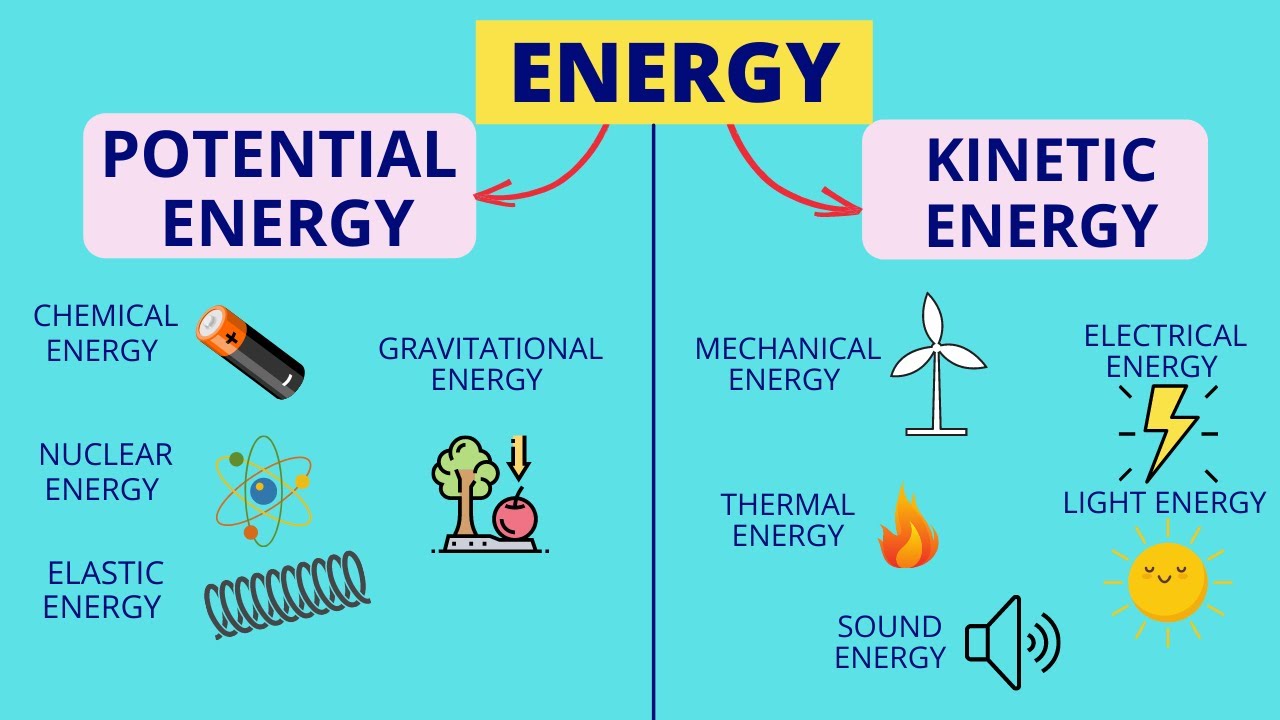
kinetic (or energy types that move) - mechanical/motion, light, sound, thermal, electrical
potential (or energy types that are stored) - gravitational potential, chemical, elastic, nuclear
See this image for a simple categorization of energy types: https://i.ytimg.com/vi/6KUP__MR4u8/maxresdefault.jpg

Optional interesting discussion (at the start of the lesson, or after an activity or two, or both):
Ask students 'What is energy?'. (A challenging question!)
The classic description: 'Energy is something that can do work', but this is not so helpful for students. A more understandable sentence is: 'Energy is something that can make things happen', or 'Energy is something carried by an object that lets it move or change in other ways', or 'Energy brings about changes in matter'. See the photo for ideas that older students can come up with.

Pick two or three activities for a lesson, brief descriptions below.
(my favourite are the Roller coaster or Jumping stick or Electric circuits with motors.

Sit in a circle and throw a bean bag to each other. Use the bean bag as a discussion tool: the student holding the bean bag can speak (similar to a talking stick).
The discussion can be specifically about types of energy - the bean bag has motion energy as it is moving. Motion energy is the energy in a moving object. Chemical energy in our hands is converted to motion energy.
The bean bag can be used as a tool to discuss what energy is.

Energy input and output in devices activity, to explore different kinds of energy transformation in familiar household devices. Include a discussion with how electrical energy is made from fossil fuels and renewable resources.

Make the jumping stick toy, to use as an example of transfer between elastic potential energy, motion and gravitational potential energy. Or a catapult has the same energy transformations.

An object can be launched into the air instead by chemical energy with the baking soda rocket demonstration.

Roller coaster has several energy transformations: gravitational potential, motion, sound and heat. (includesEnough for a whole lesson.)

Electric circuits show electrical energy converted to light and heat (as incandescent bulbs are used).
Adding motor free play converts electrical to motion energy.
Discussion on energy transformation:
A battery is a store of chemical energy. When it is connected to a circuit chemical reaction happens in the battery, making electrical potential energy (the voltage of the battery). This difference between the ends of the battery shunts electrons along the circuit (electrical kinetic energy). A bulb converts the electrical energy to light energy. A motor converts electrical energy to motion energy.

Candle convection pinwheel - heat energy is transformed into motion energy, best following Heat convection demonstration to demonstrate heat convection.
Pinwheel for younger grades who can't use candles to see transfer of motion energy.

Candle chemistry: Chemical energy contained in the candle wax (the energy holding the particles of the wax together) transforms to heat and light energy energy during combustion.

Grades taught
Gr K
Gr 1
Gr 2
Gr 3
Gr 4
Gr 5
Gr 6
Gr 7

Static electricity

Summary
Do a series of activities, some free play, to explore static electricity.
Curriculum connection (2005 science topic)
Physical Science: Chemistry (grade 7)
Procedure

Introduce the topic by rubbing a balloon on your hair to make it stand up, then give an explanation:
When we rub the balloon, atoms are pulled apart in our hair, and electrons jump from our hair to the balloon. More electrons make the balloon positively charged, which our positively-charged hair is attracted to. Static electricity is this separation of charges.
Ask students to draw the hair on end and show what is happening with the electrons.

Set up free play stations for students to explore static electricity further:
First station: Static electricity with a balloon
Second station: Jumping rice crispies
Ask students to take notes/make drawings at each station.
Gather as a group to report results, compare similarities and differences, and brainstorm for further experiments.

Once free experimentation is done (may take several sessions), run structured activities:
Static electricity sparks
Static electricity: light a bulb

Grades taught
Gr 1
Gr 2
Gr 3

Static electricity: light a bulb

Summary
Light a fluorescent bulb with static electricity.
Science topic (2005 curriculum connection)
Physical Science: Electricity (grade 6)
Physical Science: Chemistry (grade 7)
Materials
  • fluorescent bulb
  • balloon
  • dark room or cupboard
Procedure

Take a balloon and fluorescent bulb into the dark room.
Rub the balloon on your hair. This will transfer electrons from your hair onto the balloon and charge the balloon with a negative charge.
Bring the charged balloon near to the fluorescent bulb, and the bulb will light.
If it does not work right away, keep charging the balloon and trying again.

The static electricity of the balloon energizes the atoms or the mercury vapour inside the bulb. (The wall electricity does the same thing when you plug the bulb in.) As the mercury releases this energy again, it gives off UV light. This UV light collides with the phosphors in the bulb (seen as a white coating), and makes them glow. The glowing phosphors light up the bulb.
This works with a fluorescent bulb, because it needs less energy than an incandescent bulb to give out the same amount of light.

Notes

I recall it also working when the fluorescent bulb is simply rubbed hard against a sweater - test again.

Grades taught
Gr 1
Gr 2
Gr 3

Static electricity sparks and lightning model

Summary
Make small sparks with static electricity. Can be used to model lightning.
Science topic (2005 curriculum connection)
Earth and Space Science: Weather (grade 4)
Physical Science: Electricity (grade 6)
Physical Science: Chemistry (grade 7)
Materials
  • aluminium pie plate with styrofoam handle, so it can be picked up without touching the metal
  • flat of styrofoam or foam packaging, that picks up a charge when rubbed on hair
Procedure

Rub the bottom of the styrofoam/foam block on your hair. (Electrons transfer from your hair to the styrofoam, giving the styrofoam a negative charge.)
Drop the styrofoam upside down on a table or on the floor, so the negatively-charged surface is now up.
Use the handle to pick up the pie tin, then drop it onto styrofoam - do not touch the pie tin or styrofoam. (Electrons in the pie tin move away from the negatively-charged surface of the styrofoam, and so cluster on the top side of the pie tin.)
Very slowly bring the tip of your finger towards the pie tin. You should feel a tiny spark when your finger is very close, but not touching. (Electrons jump from the pie tin to your finger, to get away from the negative charge of the excess styrofoam electrons.) This spark is static electricity. Lighting is also static electricity, but with much more energy.

The pie tin is now short of electrons. Use the handle to pick up the pie tin again (so this charge is not lost). Again very slowly touch the edge of the pie tin with the tip of your finger. You should feel another small spark. (The pie tin, short of electrons, attracts electrons from your finger which jump across).

Drop the pie tin onto the Styrofoam tray again, and repeat. You can do this over several times before the sparks cease.

For younger students, this works well as a group activity with students sitting in a circle. The teacher rubs the foam flat in their hair then drops the pie plate on it, so that one student can simply bring their finger close. The whole group will hear the static electricity as it jumps.
Then the pie plate can be lifted for the next student to bring their finger close.
Only charge again once the sparks cease (after about 4 goes), or a student accidentally touches the pie plate.

Lightning is static electricity:
A lightning bolt is a dramatic example of static electricity.
In a thundercloud water droplets are caught in the updrafts and lifted to the top of the cloud where they freeze. Ice and hail move down in downdrafts. Ice and water bump together and electrons are transferred making positive and negative charges.
The strong negative charge in the bottom of the cloud attracts positive charges in the ground, which move up the tallest objects. A “leader” of negative charge descends from the cloud seeking out a path toward the ground. When it gets close to the ground, a positive charge “streamer” reaches up to meet the negative charge. When the channels connect electricity flows and we see the lightning stroke, which may repeat until the electrical discharge is complete.
The electric field often discharges between clouds.
(Thunder: lightning heats the air around it to high temperatures (30,000 °C). The heated air expands explosively, creating a shockwave as the surrounding air is rapidly compressed. The air then contracts rapidly as it cools. This creates an initial crack sound, followed by rumbles as the column of air continues to vibrate.)

Notes

This activity is variably reliable, likely because of humidity in the air, as on humid (wet) days, objects don't hold static charges quite as well.
Best inside in the winter, when the air is heated and dry.

Grades taught
Gr K
Gr 1
Gr 2
Gr 3
Gr 4
Gr 5
Gr 6
Gr 7

Static electricity: jumping rice crispies

Summary
Use a cloth to charge a plastic sheet, and make small objects jump around.
Science topic (2005 curriculum connection)
Physical Science: Force and Motion (grade 1)
Physical Science: Electricity (grade 6)
Physical Science: Chemistry (grade 7)
Materials
  • shallow tray e.g. shoebox lid
  • sheet of acrylic or other plastic (test it first!)
  • alternative to above items: large petri dish with lid
  • small piece of cloth to charge acrylic sheet or lid of petri dish (plastics seem to work well, also try wool)
  • small objects to pick up e.g. rice crispies, scraps of paper; also add others to test (try couscous, small styrofoam balls)
Procedure

Put a few of the small objects in the tray or petri dish.
Put the acrylic sheet over or put the lid on the petri dish.
Rub the top with the cloth, or with a dry hand.
The small objects will stick to the plastic sheet, and sometimes even dance up and down on their own.

Allow students to free play and explore what objects dance and which don't.
They can take notes on what they find.

Maybe give them different cloths to try. Rubbing one's hand on the plastic sheet, instead of a cloth, works quite well when the hand is dry in an indoor dry environment.

Sometimes the effect will stop after a while - try turning over the plastic sheet.

Explanation:
When the cloth is rubbed on the plastic sheet, electrons are transferred from one to the other (whether the cloth or the plastic takes the electrons depends on their relative positions in the 'Triboelectric series'). The plastic is now charged with a negative or positive charge. The small objects are attracted to this charge and so stick to the plastic.

Grades taught
Gr 1
Gr 2
Gr 3

Wings

Summary
Focus on wings as an animal adapation. Use paper airplanes to model how birds and insects can steer with their wings.
Curriculum connection (2005 science topic)
Life Science: Needs of Living Things (grade 1)
Life Science: Diversity of Life (grade 6)
Materials

Materials in the activities.

Procedure

Introduction
Birds and insects fly. How?
They push air to make them move.
Air seems like nothing to us as we are heavy. Push air into your face - feel the particles in air brushing your skin as they hit it.
When a light bird or insect pushes against air particles, they are small enough that the push makes them move.
And depending on which way they push, they can make amazing maneuvers in the air.

Watch slow motion of insects flying:
https://youtu.be/Cnn9CfsYJqc
https://youtu.be/xCQoRpStF4M
Watch slow motion of birds flying:
https://www.youtube.com/watch?v=qThIyj1mLfs.
(Also trailer for movie with Cornell lab of ornithology: https://www.youtube.com/watch?v=LjQtRr4CKcc - from 15 secs to 38 secs.)
Note: the shape of many of the wings are different on the downstroke and the upstroke.
Watch how they adjust their wing and tail feathers to change their flight direction.

Split students into three groups for activity stations
Learn how to use a magnifier together, needed for one of the stations.

Flying station
(Make planes with students if time, otherwise have paper airplanes ready for use.)
Paper airplanes fly for the same reason that birds fly.
Fly a paper airplane - make it stay aloft as long as possible.
Fold the very back of the wings up (about 2cm fkap) - how does it fly? - should stay up for at least as long.
Fold the back of the wings down - should dive to the ground.
Fold one up and one down - one of them should twist.
Just as bending the paper changes the flight path, birds move their feathers to change their flight path.
Discussion:
Birds use muscles to move their feathers by tiny amounts and change their direction of flight.

Feathers station
Look and gently touch real chicken feathers.
Look at them with a magnifier to see details of their structure. (Optional: draw them.)
Sort them into types (wing, tail and body feathers).
Discussion:
Birds have several feather types, these and others.
They are shaped for their task - stiff for flying, fluffy for insulation.

Build birds station (for younger students).
Use the wings and tail pieces of the fins and wings activity.
Add wings and tails to a modelling clay body.
Make a bird like one in the drawings, or make up your own.
Discussion:
Many different shapes of bird wings - some for gliding, some for fast flying, some for long migrations.

Grades taught
Gr 1

Slime and Silly putty recipes

Summary
Make slime/silly putty and understand the underlying chemistry. Optional: make two different consistencies and understand their different properties in terms of the molecular structure in each.
Science topic (2005 curriculum connection)
Physical Science: Properties of Objects and Materials (grade K)
Physical Science: Properties of Matter (grade 2)
Physical Science: Chemistry (grade 7)
Materials

For the classic "slime" recipe:

  • Tablespoon measure
  • Tablespoons of white glue same as number of students, plus a few
  • equal number of Tbspns water as white glue
  • 2 teaspoons borax mixed into 2 cups water
  • small (Dixie) cups, two per student
  • one coffee stirrer per student
  • 2 baggies per student

To make two different slime/silly putty recipes and compare consistencies:

  • 2 empty Dixie cups for each student
  • marker pen to label cups for each pair of students
  • 3 Tbspns water for each student, plus a Tbspn measure for each pair of students
  • borax in a cup for each pair - about 2 Tbspns, with 1/2 tspn and 1/16 tspn measure
  • stir sticks, 3 per student e.g. half coffee stirrers
  • 4 tspns white glue in each of two cups for each student
  • tray for each student
  • cornstarch on a plate
  • 2 baggies per student
  • towels for cleanup
Procedure

To make classic slime.
Make 50% white glue in water. Give students 2 Tablespoons each in a cup.
Mix 1 tspn borax into 1 cup water. Give students 1 Tablespoon each in a cup.
Students mix the cups together and stir quickly until combined.
(For measuring everything individually, use recipe 2 below.)

Play with the slime: it can flow between the fingers, but when it is suddenly pulled it breaks.
Chemical explanation of how slime is made:
The glue contains long molecules (called polymers). When borax is added it makes permanent (covalent) bonds between the glue molecules, called cross-links. These cross links form a branching web of glue polymer molecules, giving the slime its thick texture.
The following activity compares two different kinds of slime/silly putty, with different amounts of cross linking.
Chemical explanation of how silly putty behaves:
There are other bonds between the slime molecules (called hydrogen bonds), which are weaker bonds and can easily break and reform. When the slime is pulled slowly, a few of the hydrogen molecules break, but then reform with another adjacent polymer. As these hydrogen bonds continually break and reform, the slime stays in one piece but can flow and change shape. However, when slime is pulled on suddenly, many hydrogen bonds are broken at once, so it breaks apart.

To make two different slime/silly putty recipes, with different consistencies
Ask students to work on the tray, as this activity is messy.

First make the classic slime recipe as follows:
Give students their materials: 4tspns of glue in a cup, an empty cup, a squeeze bottle of water and a tablespoon measure, borax powder in a cup and a 1/16tspn or equivalent measure (I use two scoops of a very small measure).
Instructions for students:
To an empty cup, add 1 Tbspn water and 1⁄16 tspn borax. Mix well.
To 4 tspns glue in a cup, add 1 Tbspn water. Mix well.
Pour the borax mixture into the white glue mixture. Mix well.
Lift the blob out of the cup, and into a small baggie.
Mould with hands through the bag to mix completely.
Pull the blob out of the bag, leaving any liquid behind.
Mould with hands until smooth.

Allow students time to play with their slime.
If slime is not stretch enough, gradually work in some more water.

Discuss how and draw how the borax molecules cross link (or bridge) the long glue molecules, binding them together so that the glue is more solid but can still flow.

Then make another slime recipe:
First tell students that they will add a lot more borax to this recipe and ask what more cross links of borax will do to the texture of the slime that they make [it will be more solid].
Do the experiment:
To an empty cup, students add 1 Tbspn water and ½ tspn borax. Mix well.
Pour the borax mixture into the cup of 4 tspns white glue. Mix well.
Lift the blob out of the cup, rest for 5 minutes.
Mould with hands into a ball.
Roll in cornstarch to make less sticky.

This recipe makes a much more solid ball, which can be bounced.

Review the consistencies in terms of the molecules that make silly putty (see last photo):
In a chemical reaction, the borax molecules bridge (or "cross-link") the glue molecules together, turning the two liquids into something more solid.

Other background chemistry: White glue is a polymer, which is a long chain of repeating units. Other polymers are nylon and plastics, as well as naturally occurring rubber. Polymers can be cross-linked at any of the repeating units along their chain, so the amount of cross-linking determines how solid they become.

Slime is a non-Newtonian fluid - its viscosity changes depending on how much force is applied. (Standard Newtonian fluids only change viscosity with changes in temperature.) When a sharp force is applied to slime it becomes rapidly more viscous and behaves more like a solid.
More info on slime: http://www.acs.org/content/dam/acsorg/education/resources/highschool/ch…

Grades taught
Gr K
Gr 1
Gr 2
Gr 3
Gr 4
Gr 5
Gr 7

Heat and Rates of Reaction

Summary
Use light sticks and dry ice for a dramatic lesson on rates of reaction and how they change with heat.
Curriculum connection (2005 science topic)
Physical Science: Properties of Matter (grade 2)
Physical Science: Chemistry (grade 7)
Procedure

Compare how brightly light sticks glow when dipped in hot and cold water, and discuss rates of this chemical reaction.
Observe the dramatic reaction of dry ice turning to gas as it is added to warm water.
Add detergent to make dry ice bubbles.

Review the chemistry of the lesson:
The light sticks glow because a chemical reaction makes a new glowing molecule. The rate of this chemical reaction can be sped up by dipping the light stick in warm water, or slowed down by dipping in cold water.
Dry ice sublimes at room temperature, making clouds of carbon dioxide gas in the air, and violently bubbles as the gas is rapidly formed in warm water.

Grades taught
Gr 2
Gr 3

Dry ice source

Summary
Source of dry ice pellets. Bring a styrofoam container, or you will need to buy one there.
Curriculum connection (2005 science topic)
Physical Science: Properties of Matter (grade 2)
Physical Science: Chemistry (grade 7)
Type of resource
Store
Resource details

Praxair, now Linde. 2080 Clark Drive, Vancouver BC