
ingridscience

Dry ice in water

Summary
Add dry ice (solid carbon dioxide) to warm water and observe a dramatic state change from solid to gas.
Science topic (2005 curriculum connection)
Physical Science: Properties of Matter (grade 2)
Physical Science: Chemistry (grade 7)
Materials
  • dry ice in styrofoam box, see reference for source
  • thick glove (e.g. gardening glove) to handle dry ice
  • tub or tray of warm water for a group of 3-4 students
Procedure

Show students a chunk of dry ice (only hold with thick gloves, as it will give cold burns to skin). It is carbon dioxide in its solid state and is very cold, -80ºC! The solid carbon dioxide does not stay solid very long in a warm room, but instead of turning to a liquid then a gas, it turns straight into a gas - called “sublimation”. The gaseous carbon dioxide can be seen as white clouds surrounding the solid chunk of dry ice.

For each student group around a tub of warm water, drop in a few nuggets of dry ice. The students must not touch the dry ice.
The warm water will dramatically speed up the state change from solid carbon dioxide to gas: large bubbles of carbon dioxide gas form in the water. At the surface, warm water that has evaporated comes in contact with the cold carbon dioxide gas and re-condenses into tiny droplets, forming white clouds. The white clouds, a mixture of water droplets and carbon dioxide gas, spill over the sides of the container and fall to the ground (as carbon dioxide is heavier than air).

If the reaction slows before the dry ice is used up replace the water with more warm water.

If you allow most of the dry ice to sublimate in the tray, small pieces will float to the surface of the water, and spin and zoom around. As gas projects from one side, it pushes the dry ice it in the other direction (Newton's Law of action and reaction). If the gas comes from an angle it will start it spinning.
It behaves as a hovercraft does - the gas escaping from the bottom of the dry ice piece makes a layer of gas between the dry ice and water, so that it can skim with very little friction over the surface of the water.
The small pieces are safe to touch briefly, so students can redirect the direction of the dry ice pieces with a light touch.
Grades taught
Gr 2
Gr 3
Gr 4
Gr 5

Heat transfer and sources

Summary
Experiment with ways that heat can be transferred (conduction, convection, radiation) and/or look at how we make heat.
Procedure

Introduce heat (also called thermal energy), and that it can move from place to place.
It can move by Radiation (as waves, like light), Conduction (between materials that are touching) and Convection (flowing in a gas or liquid).
Ask students to rub their hands together to make heat by friction.
Brainstorm on sources of heat.

Do a selection of the activities.

My favourite sequence:
Use a heat lamp in a circle to introduce radiation.
Look at IR images together and discuss sources of radiation.
Hand out Heat sensitive sheets to introduce conduction.
Do an experiment together with the heat sheets, demonstrating conductors and insulators.
Allow free play with the sheets (using the heat lamps to charge them), so exploring radiation and conduction.
End back at the circle for a convection demonstration.

Activity descriptions:

Heat sensitive sheets are super fun and demonstrate conduction and radiation (but are expensive).
Outdoors on a sunny day, the sun heats them up with its radiation. Warm playground equipment or walls can heat them up by conduction. Shadows or cool water make patterns on them.
Indoors, heat lamps heat the sheets up by radiation. By touching classroom surfaces they are cooled down by conduction.
The sheets can also be used to demonstrate heat transfer through a conductor (e.g. tin foil) and an insulator (e.g. felt).

Activities that show different ways that heat can move:
Convection activity: heat convection demonstration (can use hot water from a thermos if outdoors).
Convection activity indoors (where there are no drafts): candle heat pinwheel
Radiation indoors: infra red heat lamp demonstration then free play with heat sensitive sheets (radiation and conduction).
Heat sensitive sheets can be heated up by radiation from a lamp, and cooled by conduction.
Conduction activity (needs electric kettle, so indoors easiest): heat conduction in different materials.

Heat sources activity.
Show infra red camera images to show sources of infra red radiation (e.g. a house with windows radiating heat, a dog with heat radiating from parts of its body, also IR images of galaxies).

End by summarizing ways that heat can travel.
Both conduction and convection need molecules to transfer the heat energy.
Radiation does not need molecules. The sun is a source of radiation and travels through the vacuum of space to reach Earth.

Explain that heat transfer makes our weather and our ocean currents:
Heat radiation from the sun heats up the Earth. The warm molecules of the ground heat up the air molecules above it by conduction. The warm air molecules move upwards by convection. The warm air moving up has gas water molecules in it, which cool as they rise to form clouds, which make rain - the water cycle! When warm air moves upwards, air moves sideways to replace it, which creates winds.
In our oceans warm water rises and flows on the surface. Other water moves to take its place. This mass movement of water caused by heat transfer (as well as salt differences) creates our global ocean currents. Water holds a lot of heat without getting warmer (it has a high "heat capacity"), so ocean water keeps the temperatures moderate in adjacent areas.

Grades taught
Gr 2
Gr 3
Gr 4

Heat conduction

Summary
Learn what heat is, and investigate how it moves within and between materials.
Curriculum connection (2005 science topic)
Physical Science: Properties of Matter (grade 2)
Physical Science: Chemistry (grade 7)
Procedure

For younger students heat can be referred to as energy. For older students, what is happening in terms of molecules is helpful.

Review states of matter: molecules in solids, liquids and gases.

Demonstration to discuss what heat is (energy; the speeding up of molecules): Heat conduction in a metal rod.

Experiment to investigate how fast heat moves in different materials.

Relate how heat moves to every day experiences with activity: What materials feel warm?

Notes

For grades 2/3, explaining in terms of molecules was too confusing. Stick with heat as energy for all explanations for this grade.

Grades taught
Gr 2
Gr 3

Heat: What materials feel warm and cold?

Summary
Touch different materials and record how warm they feel. Understand why in terms of heat transfer.
Science topic (2005 curriculum connection)
Physical Science: Properties of Matter (grade 2)
Physical Science: Chemistry (grade 7)
Materials
  • classroom with a variety of surfaces to touch, including metals
  • worksheet and pencil for each student
Procedure

Students are instructed to walk around the classroom, and touch different surfaces (e.g. metal, paper, wood, plastic, other objects they find).
Each time they touch a surface, they should count to three and then record how warm it feels. Record on their worksheet (attached below): warm, cold, or in between?
Discuss results as a class. Generally metals will feel colder, and insulators such as plastic and wood, and especially cloths or fur, will feel warmer. BUT without guidance as they touch each object, students will generate a variety of results (see photo).

Discuss what is happening:
Your hand is warm. Some materials can take that warmth away better than others. Metal is a good conductor, and the heat of your hand flows through the metal easily, so your hand loses heat to the metal and feels cooler. Other materials (good insulators such as plastic, wood and cloth) do not take the warmth away very easily, so your hand still feels warm.

Higher level discussion of results in terms of what the molecules are doing:
The molecules in your finger are moving faster than the molecules in the room-temperature materials. Because metal is a good conductor, the heat from your finger is transferred to the molecules in the metal. This decreases the motion of the molecules in your skin and makes your skin feel colder.
The molecules in your finger are moving faster than the molecules in the plastic/wood/cloth. But because plastic/wood/cloth is a poor conductor (a good insulator), the heat energy from your finger is not transferred to them, so your skin stays feeling warm.
Video of the molecule movement here: http://www.middleschoolchemistry.com/multimedia/chapter2/lesson1#conduc….

See heat sensitive sheets for a better activity on conductors and insulators.

Notes

This does not work so well without some thoughtful preparation. The results can be very subjective, depending on students' hand warmth and the texture of the object they touch.
Try with larger more-comparable sheets of each material: https://www.exploratorium.edu/snacks/cold-metal
Or discuss why metals feel cold and other materials feel warm before students start the activity. Then they will be looking for confirmation.

Grades taught
Gr 2
Gr 3

Heat conduction in different materials

Summary
Observe the varying speed of heat conduction in metal, plastic and wood.
Science topic (2005 curriculum connection)
Physical Science: Properties of Matter (grade 2)
Materials
  • coffee cup
  • ideally, strips of the same size, about 15cm by 2cm, and the same thickness made from different materials e.g. aluminium metal (cut from a baking tray or aluminium sheet), plastic (cut from a plastic place mat) and wood (a large craft stick). Copper strip from a metals supplier. If these are not available use a metal and plastic spoon of about the same size, though test first
  • coins, one per strip - pennies, or nickels are heavier and work better if using spoons
  • vaseline
  • kettle for boiling water
Procedure

Prepare the strips for the activity:
Add a small smear of vaseline to the end of each strip. (If you are using spoons, try and find ones with flat handles, and add the vaseline to the handle end.) Make sure you use the same amount each time and add it in the same spot. (Using an applicator, such as a coffee stir stick, will help to make the amounts more consistent - see photo.)
Push a penny, or a nickel, into the vaseline on each strip.

Each table group can have a set of strips with pennies, and a coffee cup.

Add just-boiled water to fill the coffee cup until quite full, then simultaneously add the metal, plastic and wooden strips to the water with the pennies pointing upwards. (If you are using metal and plastic spoons, place the wider scoop end into the hot water). Make sure the strips are sloped outwards by the same degree, so that this is not a variable in the penny falling off. For most students, it is best if the teacher does this step, to make it as fast and consistent as possible.

Students record on worksheet (see attachment) which penny falls off first, second and third. (See photos for my usual order of pennies falling off.) Some pennies may stay stuck for longer than you want to run the activity, but make sure at least one has fallen off before stopping. If the water has cooled before some pennies have fallen, take out the strips, replace the water with new just-boiled water, and return the strips to the cup - students will become quite engaged in the "race" as the last pennies in the class fall.

Metal strips are expected to release the penny first, but some experiments may differ. Plastic and wood release the penny later.
Record the class results, to find out what happens most of the time, and to use for discussion.

Discuss the mechanism:
Heat moves up the strip by conduction. Once the heat energy reaches the vaseline it melts it and causes the penny to fall off. The different materials conduct heat at different rates: metals conduct heat the fastest, wood and plastic much slower.

Discuss the molecular mechanism with older students:
The molecules of the water are moving around fast. As they bump into the end of the strip that is immersed in the water, they transfer their energy to molecules in the strip, which also start to move around faster. The molecules at the bottom of the strip bump the molecules higher up the strip and their heat energy is transferred too, so spreading the heat energy up the strip. In different materials, the molecules are more or less able to transfer heat energy to the neighbouring molecules, so the rate of heat transfer varies. When the heat energy reaches the vaseline it melts it (the molecules of the vaseline move faster as they change from solid to liquid). The melted vaseline can no longer hold onto the penny, so the penny drops.
The movement of heat when molecules transfer energy between each other by colliding with each other is called “conduction”.

Metals are better heat conductors than plastic and wood. A material that is not a good conductor is an "insulator".

See heat sensitive sheets for a simpler activity on conductors and insulators.

Notes

With older students you might want to try 2 kinds of metals: aluminium (which is a very good conductor) and steel (which is not such a good conductor)..
I would suggest running as a demonstration for grades 2/3 and below, to eliminate any variables from the students (knocking or touching).
I have found heat a tricky topic to bring to hands-on science. There seem to be a lot of variables that need to be discovered through prototyping before bringing and activity to the classroom.
Try cutting different lengths of aluminium and comparing?

Grades taught
Gr 2
Gr 3

Heat convection demonstration

Summary
Observe a beautiful demonstration of heat convection.
Can also be used to demonstrate the convection currents in the Sun.
Science topic (2005 curriculum connection)
Earth and Space Science: Stars and Planets (grade 3)
Physical Science: Properties of Matter (grade 2)
Physical Science: Chemistry (grade 7)
Materials
  • large tub with clear sides (I use a 15L clear storage tub) - remove all labels
  • cold water, to fill the tub (from the cold tap is fine)
  • styrofoam cups
  • food dye - blue or darker colours work best
  • pipette or eye dropper
  • kettle, for boiling water
  • four tin cans, or supports, taller than a styrofoam cup
Procedure

Set-up prior to experiment:
Stand a desk or table in an open area of the classroom. Arrange the four cans on the desk so that they can support the tub at each corner. Fill the large tub with cold water and stand it on the four cans so that it is stable. Wait for the water to become completely still before proceeding. Boil the kettle of water, so that it is quick to boil again. (Outdoors, hot water from a good quality thermos will work fine. Heat pads that get very hot also work, though not as well.)

Demonstration:
Ask all the students to sit in a circle around the tub, so that they can see through the sides of the tub.
Suck up a little food dye into the pipette, then very slowly and carefully lower the pipette into the water and deposit a pool of food dye on the base of the tub. Slowly remove the pipette from the tub, so as to disturb the water as little as possible. (A second pool of food dye was used as a control in the photos above, but this is optional.)
Get the styrofoam cups ready - use one, or stack them, until they just slide under the tub.
Bring the kettle to the boil again, then immediately fill the a styrofoam cup (stack) with boiled water. Slide the cup(s) under the tub, and leave it directly below the pool of food dye.
After a few seconds, streams of food dye should start to flow upwards from the food dye (see last photo above).
Make sure all the students are able to see the food dye streaming upwards before continuing discussion. You may need to carefully wipe condensation from the outside of the tub for a clearer view.

Explanation:
The hot water in the styrofoam cup heats up the water and food dye directly above it, making the molecules here move faster as they gain heat energy. This group of fast moving molecules flow upwards in the water (because they are less dense than the surrounding cooler water). They take heat energy with them, and are moving by "convection". The visualized convection currents are beautiful as they trace out the curving patterns of heated water.
Convection is the movement of a group of higher-energy molecules through a liquid, or a gas. Convection is how heat moves around the air in the classroom.

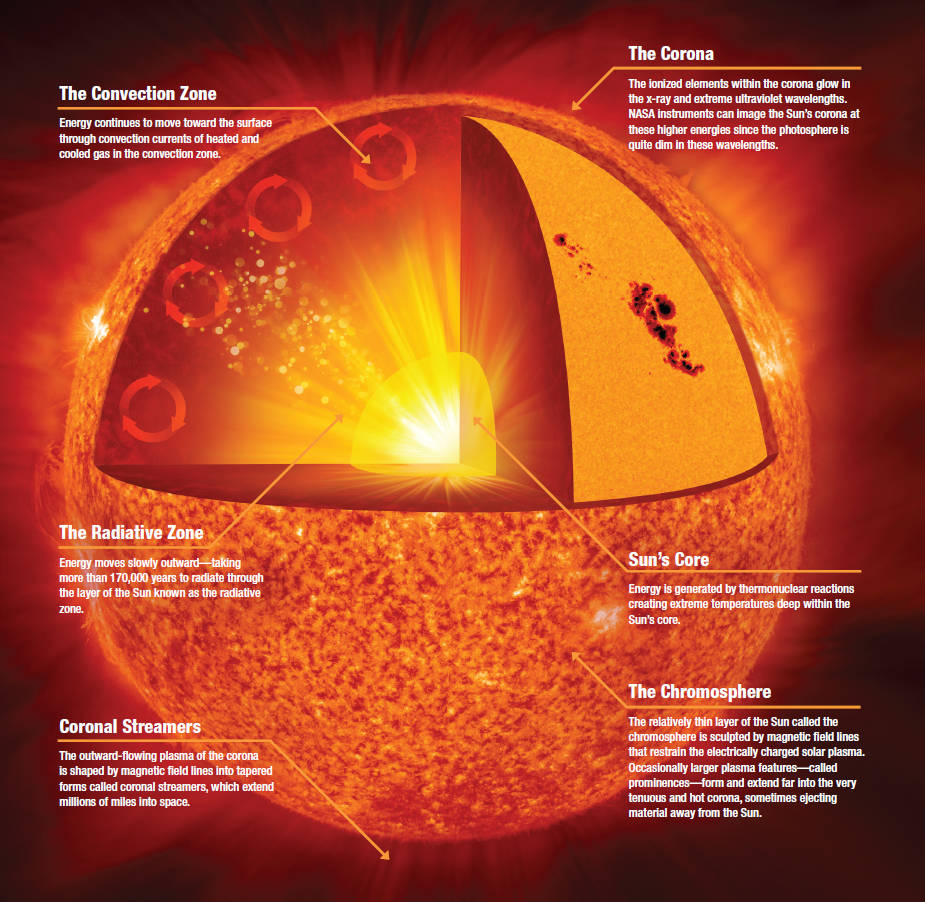
For a lesson on the Sun, this demonstrates the convection currents that carry hot gas (not liquid) from the centre to the surface of the sun.
Diagram of section of the sun with convection zone: https://www.nasa.gov/wp-content/uploads/2023/03/655928main_solar-anatom…
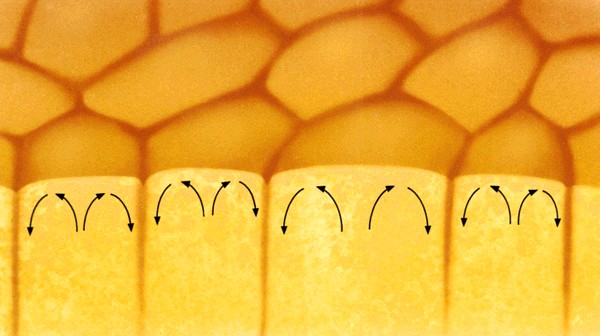
Each granule has a bright centre, which is the hot gas rising through a thermal column. The granules’ dark edges are the cool gas descending back down the column to the bottom of the convective zone. (From https://education.nationalgeographic.org/resource/sun/.)
Many, separate convection cells, form the granulation patterns on the surface of the sun.
Image of convection cells in the sun: http://astrobites.com/wp-content/uploads/2012/07/kauf18_4.jpg
Video of granulations on the sun's surface: https://www.youtube.com/watch?v=hXEYbovTUr0 http://solarscience.msfc.nasa.gov/images/SVST_granulation.mpg

Notes

This and other convection demonstrations at www.youtube.com/watch?v=IpnHAj4R-Z8
Alternative set up: add an ice cube to the top of water. Drop food colouring on top of the ice cube. ?But then we see cold water sink, rather than warm water rise?
A thermometer dipped in should detect the difference between the warm water at the top and cooler water below. (From book Weather Watcher p.34, DK)
Coloured tablets (e.g. to put in the bath) do not dissolve fast enough to work.
Make convection cells with pearlescent shampoo in water in a tin plate on a hot plate.

Grades taught
Gr K
Gr 1
Gr 2
Gr 3
Gr 4
Gr 5
Gr 6
Gr 7

Heat and insulation in lunch bags

Summary
Find the various insulators in lunch bags.
Science topic (2005 curriculum connection)
Physical Science: Properties of Matter (grade 2)
Materials
  • students' lunch bags
  • worksheet (attached below)
Procedure

Students get out their lunch bags and open them up. They look at the containers and the bag itself, to find insulating/reflective materials, which slow down heat movement.
Heat always moves from a hotter object to a cooler object. Lunch bags and food containers are designed to either keep heat in food that needs to stay warm, or away from foods that need to stay cool.
Students draw their lunch bag, and the insulators they found, optionally on the “Lunch bag insulation” worksheet (attached below).

Examples:
Anything padded or thick plastic (lunch bag itself, plastic containers, thick wrapping) does not transfer heat well, so will block heat from getting into food that needs to stay cold, or keep heat in food that needs to stay warm.
Metal soup containers and thermos flasks have a layer of air between two walls. Air does not conduct heat so well, so slows down heat leaving the container.
Silver-lined bags reflect heat (by a heat transfer process called “radiation”), so keep heat inside a container, or keep heat away from things that need to stay cool.

Grades taught
Gr 2
Gr 3

Heat melting ice cubes

Summary
Compare how fast ice cubes melt when wrapped in different materials and then exposed to warm water/warm classroom air.
Science topic (2005 curriculum connection)
Physical Science: Properties of Matter (grade 2)
Physical Science: Chemistry (grade 7)
Materials
  • aluminum foil
  • materials to test e.g. thin fabric, thick fabric, paper towel, thick plastic, thin plastic (saran wrap)
  • ramekin
  • ice cubes
  • plastic tub
  • kettle and water
Procedure

This activity still in prototyping stage.

Best method so far is to use hot water to melt ice cubes, which are nested in different materials.
Photos show how to make a nest, with a piece of tin foil and an optional inset of cloth/plastic. The nests are pushed into a ramekin (or other small bowl with a flat base) to shape them. Add ice cubes of the exact same size to each nest, and float the nests in a tub of just-boiled water.
Students record which ice cube melts first, second etc. But nests often leak or tip over, in which case that nest is excluded from a group's results.
In all groups, the ice cube in the foil nest melts first. Then the ice cube in a plastic sheet, then tissue paper, thin cloth, thick cloth, and lastly bubble wrap.
To adapt the method, somehow clip/tape the nests to the side of the tub so they don't fall over.
Discussion: The heat energy in the air is transferred to the ice and heats it up and melts it, by conduction. The cloth/thick plastic does not conduct heat well, so slows down how rapidly the ice melts. Tin foil is a metal and is a good conductor - it transfers the heat energy rapidly to the ice, so the ice melts fastest when in a nest made of only tin foil.

Previous experimental method (see last three photos):
Each student group is given ice cubes to wrap in different kinds of cloth (fur, thin cloth, or no cloth).
https://www.acs.org/content/dam/acsorg/education/resources/k-8/science-…
Problems: It takes a long time to completely melt the ice cubes (an hour or more), and the ice cubes must start out exactly the same size to be able to compare their final sizes. Other variables are how quickly the students wrap each ice cube and how hot the classroom is.

Notes

Try doing the experiment on a paper towel and measuring the size of the wet patch. But cloths used to wrap the ice cube soak up some of the water. Don't fold the cloth entirely around the ice cube, as depending on where the folds are in the cloth, the liquid will escape onto the paper towel at different rates.
Instead of foil nests try in plastic cups BUT need to pack them tight with the test materials or air is included, and somehow stop the paper/cloth absorbing the melted ice.

Grades taught
Gr 2
Gr 3

Heat conduction in a metal rod

Summary
Feel metal rods before and after they have been dipped in hot water. Discuss heat (thermal energy) transfer in terms of molecule motion.
Science topic (2005 curriculum connection)
Physical Science: Properties of Matter (grade 2)
Physical Science: Chemistry (grade 7)
Materials
  • long metal objects that conduct heat well
  • if available: copper rods approx. 30cm long
  • kettle of recently boiled water
Procedure

Space the metal rods out around the circle of students, and ask the students to touch a metal rod and feel how warm it is. (You may need to ask them not to hold them as warmth from their hand heats up the rod.)
Gather up the rods, briefly dip them in the kettle of recently boiled hot water, then lay out again. Ask the students to briefly (copper metal heats up very fast) touch the end that was in the water.
Students may also explore and feel the end of the rod that was not in the water, and the centre of the rod, and notice differences along the rod. They may also notice that after a short while, the whole rod will cool down again.
Discuss what is happening in terms of heat:
The molecules of water moved around faster as they were heated up. (Simulation of molecule movement in a liquid as it is heated: http://www.middleschoolchemistry.com/multimedia/chapter1/lesson2.) These faster moving water molecules transfer energy to the metal rod where they are touching. The energy from the hot water makes the molecules of the metal rod move faster, which we can feel as the rod heating up. The heat spreads up the rod as the faster molecules at the end of the rod bump into adjacent molecules and give them energy too - so the middle of the rod (even though it was not touching the water) got warmer as well. Eventually the molecules lose their heat energy to the air and the rod cools down again.
The movement of heat when molecules transfer energy between each other by colliding with each other is called “conduction”.

Notes

ingridscience afterschool used a large copper rod in a campfire to feel conduction

Grades taught
Gr 2
Gr 3
Gr 5

Newspaper house

Summary
Use newspaper rods fastened together with masking tape, to assemble a free-standing structure that students can get into.
Science topic (2005 curriculum connection)
Physical Science: Materials and Structures (grade 3)
Materials
  • stiff rods, plastic or wood, 1 or 2cm in diameter and ~40cm long e.g. pieces of broom handle or conduit pipe. One for each pair of students.
  • newspapers (large format best), a couple per student group
  • Masking tape, one roll for each pair of students
Procedure

Tell students that they will build a structure large enough for at least one student to get into (and might fit more). Their structure will only be made from newspaper and tape, and must stand up on its own.
Students work in groups of two, three or four.

Older students could be given the challenge with no further instructions.
Most students will need to be shown how to make rods, that they can then build a structure from.

Rod preparation:
Roll a sheet of newspaper snugly around a plastic/wooden rod (see photo), by rolling on a flat floor.
(Large structures will need rods made of more than one sheet of paper - the larger structures in the photos had 8-sheet rods.)
Then use three small pieces of masking tape to secure the ends and centre of the newspaper so that it forms a rod.
Remove the rod from inside the newspaper roll.
A sheet of newspaper can be rolled along its longer edge, or diagonally to make longer rods.
Make sure the rod is not rolled up inside (keep moving it outwards to keep one end of the rod exposed).
For making larger structures, optionally make a class supply of rods as a class before the building day. For large structures, the class needs about 50 rods for each group of four students.

Students may figure out how to join their rods, or optionally show them one method:
Flatten the ends of two newspaper rods. Hold the flat faces tightly together and bind them tightly with masking tape, to make a strong and flexible joint (see photo).
Two students working on a joint together will allow the strongest joints to be made, as some hand strength and coordination is needed.
If an additional rods needs to be added to a joint, flatten the end of the additional rod and added to the stack of flat rod-ends, then tape.
As more weight is added to a structure, weak joints will not support the load. Strong individual joints will ensure success of a larger structure.

Either before they start, or I prefer when they have been building a little while, show students that triangles are strong shapes: a square of four rods will collapse sideways, but by adding a diagonal rod to make two triangles it will be stable.
If the strength of triangles is discussed before building, students may want to make up triangles first, then build these into a structure.

During the building encourage groups to borrow ideas from each other.
Once the frame is in place, students may want to add a skin of a single sheet of newspaper.

Notes

The Big Build takes a lot of classroom space (so tables must be cleared), or it can be done needs a gym or activity space. Rod preparation can be done in the regular classroom space.

The photo of the structure with the girl inside was made with 50 rods.

Students can sit in their structures to watch a video on how other animals build structures - and notice the shapes in them.

Grades taught
Gr 2
Gr 3
Gr 4
Gr 5