This activity is adapted from a NASA activity no longer available. Similiar activity also at https://www.teachengineering.org/view_activity.php?url=collection/cub_/…
Introduce gravity assist:
We have used rockets to send probes to many parts of the solar system, and beyond.
Show image of current position of probes: https://armchairastronautics.blogspot.com/p/solar-system-missions.html
For sending spacecraft long distances, we need to keep the fuel usage to a minimum, as much of the weight of a rocket is fuel (90%). Rockets use most of their fuel to escape earth’s gravity. Then the gravity of planets or moons are used to alter a spacecraft's path and speed, with only small amounts of fuel needed for course-adjusting thrusts. Using the gravity of other bodies to change the speed and direction of a spacecraft is called 'gravity assist', 'gravitational slingshot', or 'swing-by', and has been used to send probes to the outer reaches of, and beyond, the solar system, as well as closer missions around the Earth's Moon.
Students model gravity assist by using a steel ball (the 'spacecraft' or 'probe'), which is rolled down a ramp ('launched') onto a plexi sheet. Magnets taped to the underside of the plexi pull on the steel ball, modelling the 'gravity' of planets in its path, deflecting the spacecraft as it passes by. The amount of deflection depends on the speed of the spacecraft, how close it passes by the planet and the gravitational strength of the planet.
Show students how to set up the gravity assist activity:
Draw a line down the centre of the plexi, along its length, then set it on the four supports in the tray. Make sure the ramp is taped to point directly along the path. Release the spacecraft down the ramp and make sure it follows the line. If it does not, the desk is not entirely level, so rotate the tray and launch again, repeating this adjustment until the spacecraft follows the line down the centre of the plexi. Then leave the tray in this position. (If a desk is very tipped, the activity will not work so well, so assist students in choosing a level desk.)
Now add a planet: Tape the magnet underneath the plexi, positioned just to the side of the central line and half way along it.
When the ball is released from the top of the ramp, it should reproducibly deflect a small amount around the magnet. If it does not, adjust the height of the ramp or the position of the magnet.
Structured format to activity:
Show students their worksheet (see attachment), for recording how spacecraft speed and gravity of a planet affect the spacecraft's trajectory.
Students change the speed of the spacecraft by releasing the ball from the top of the ramp (faster) or lower down (slower). Increase the gravity of the planet (i.e. a larger planet) by adding magnets underneath the taped magnet.
Show students how to measure the angle of deflection for the different conditions they try: make a mark where the ball rolls off the plexi, and repeat until the marks are consistently on top of each other. Then draw a line from this mark back to the centre line next to the magnet. Use a protractor to measure the angle between the centre line and the angled deflection path.
Discuss class data:
Although there will be much variability in the angles measured (depends on slope of desk, position of magnet etc) , decreasing the speed of the spacecraft by releasing at a lower position on the ramp should generally produce greater angles of deflection. Increasing the gravity of the planet, by adding more magnets, should generally produce greater angles of deflection.
Optionally, a class graph can be made of the increase/decrease in angle when changing from low to high gravity and high to low speed.
Show students trajectories of real spacecraft that have used gravity assist (see below), and challenge students to replicate some of these.
Connection to the Artemis Moon mission
Challenge students to position their magnet, which now represents the gravity of the Moon, so that their spacecraft orbits around the Moon and returns to the launch site on Earth.
With some experimenting with the angle of the plexi sheet, students may even be able to model the figure of 8 trajectory that the Integrity spacecraft made around the Moon and back to Earth. With this trajectory, the spacecraft flies in ahead of the Moon’s orbit before looping around it, and the Moon slows it down and makes it curve back towards Earth. This is called a 'Free return trajectory', as even with engine failure, the spacecraft returns to Earth.
If a spacecraft flies in behind the object it is passing, gravity would sling the spacecraft further out into space. This is useful if this is the desired trajectory, but not if the spacecraft is returning to Earth.
Free experimentation:
After guided measurements and challenges, allow students to place their magnets and launch ramp in any positions and freely experiment.
Some of them will want to employ their own methods e.g. tipping the plexi to combine gravity with magnetic force to direct their ball e.g. purposely placing magnets so that their spacecraft 'crash-lands' on a planet.
Students will be excited to share how they made their trajectories.
End discussion
Conclude with how even a small difference in the speed of the spacecraft or the position/gravity of a planet makes a dramatic change in the trajectory of a spacecraft. Space scientists do all this planning with math! They calculate when a spacecraft must launch (the 'launch window'), and in which direction (to take advantage of the spin of the Earth to speed it up). The calculations include the movements of the planets, so that the spacecraft flies by in a predicted path - whether the probe passes behind or in front of the planet in its orbit determines whether it speeds up or slows down the spacecraft. Gravity assists of close approach only last a few hours. It takes years for a probe to reach its destination planet - the distances are huge. But the math of all the motions and speeds of objects can calculate how to reach these far away objects. Small fuel 'burns' are used to minorly adjust a trajectory and keep a spacecraft on course.
Real gravity assist trajectories (as of Spring 2019):
1. New Horizons flew by Jupiter (and sent back detailed images) to direct it to Pluto. New Horizons is currently in the Kuiper belt.
2. Juno flew by Earth for its gravity assist out to Jupiter. On its gravity assist to orbit Jupiter, it was a slow-down. [Ingrid check]
3. Voyager 1 used gravitational assist from Jupiter and Saturn and in August 2014 entered interstellar space. Voyager 2 swung by Jupiter and Saturn and then also Uranus and Neptune and just entered interstellar space. Animation of the paths of Voyager 1 and 2, showing the trajectory changes from gravity assist: https://www.theplanetstoday.com/voyager_flight_path.html
News article when Voyager 2 entered interstellar space: https://www.cbc.ca/news/technology/voyager2-interstellar-space-1.5274614
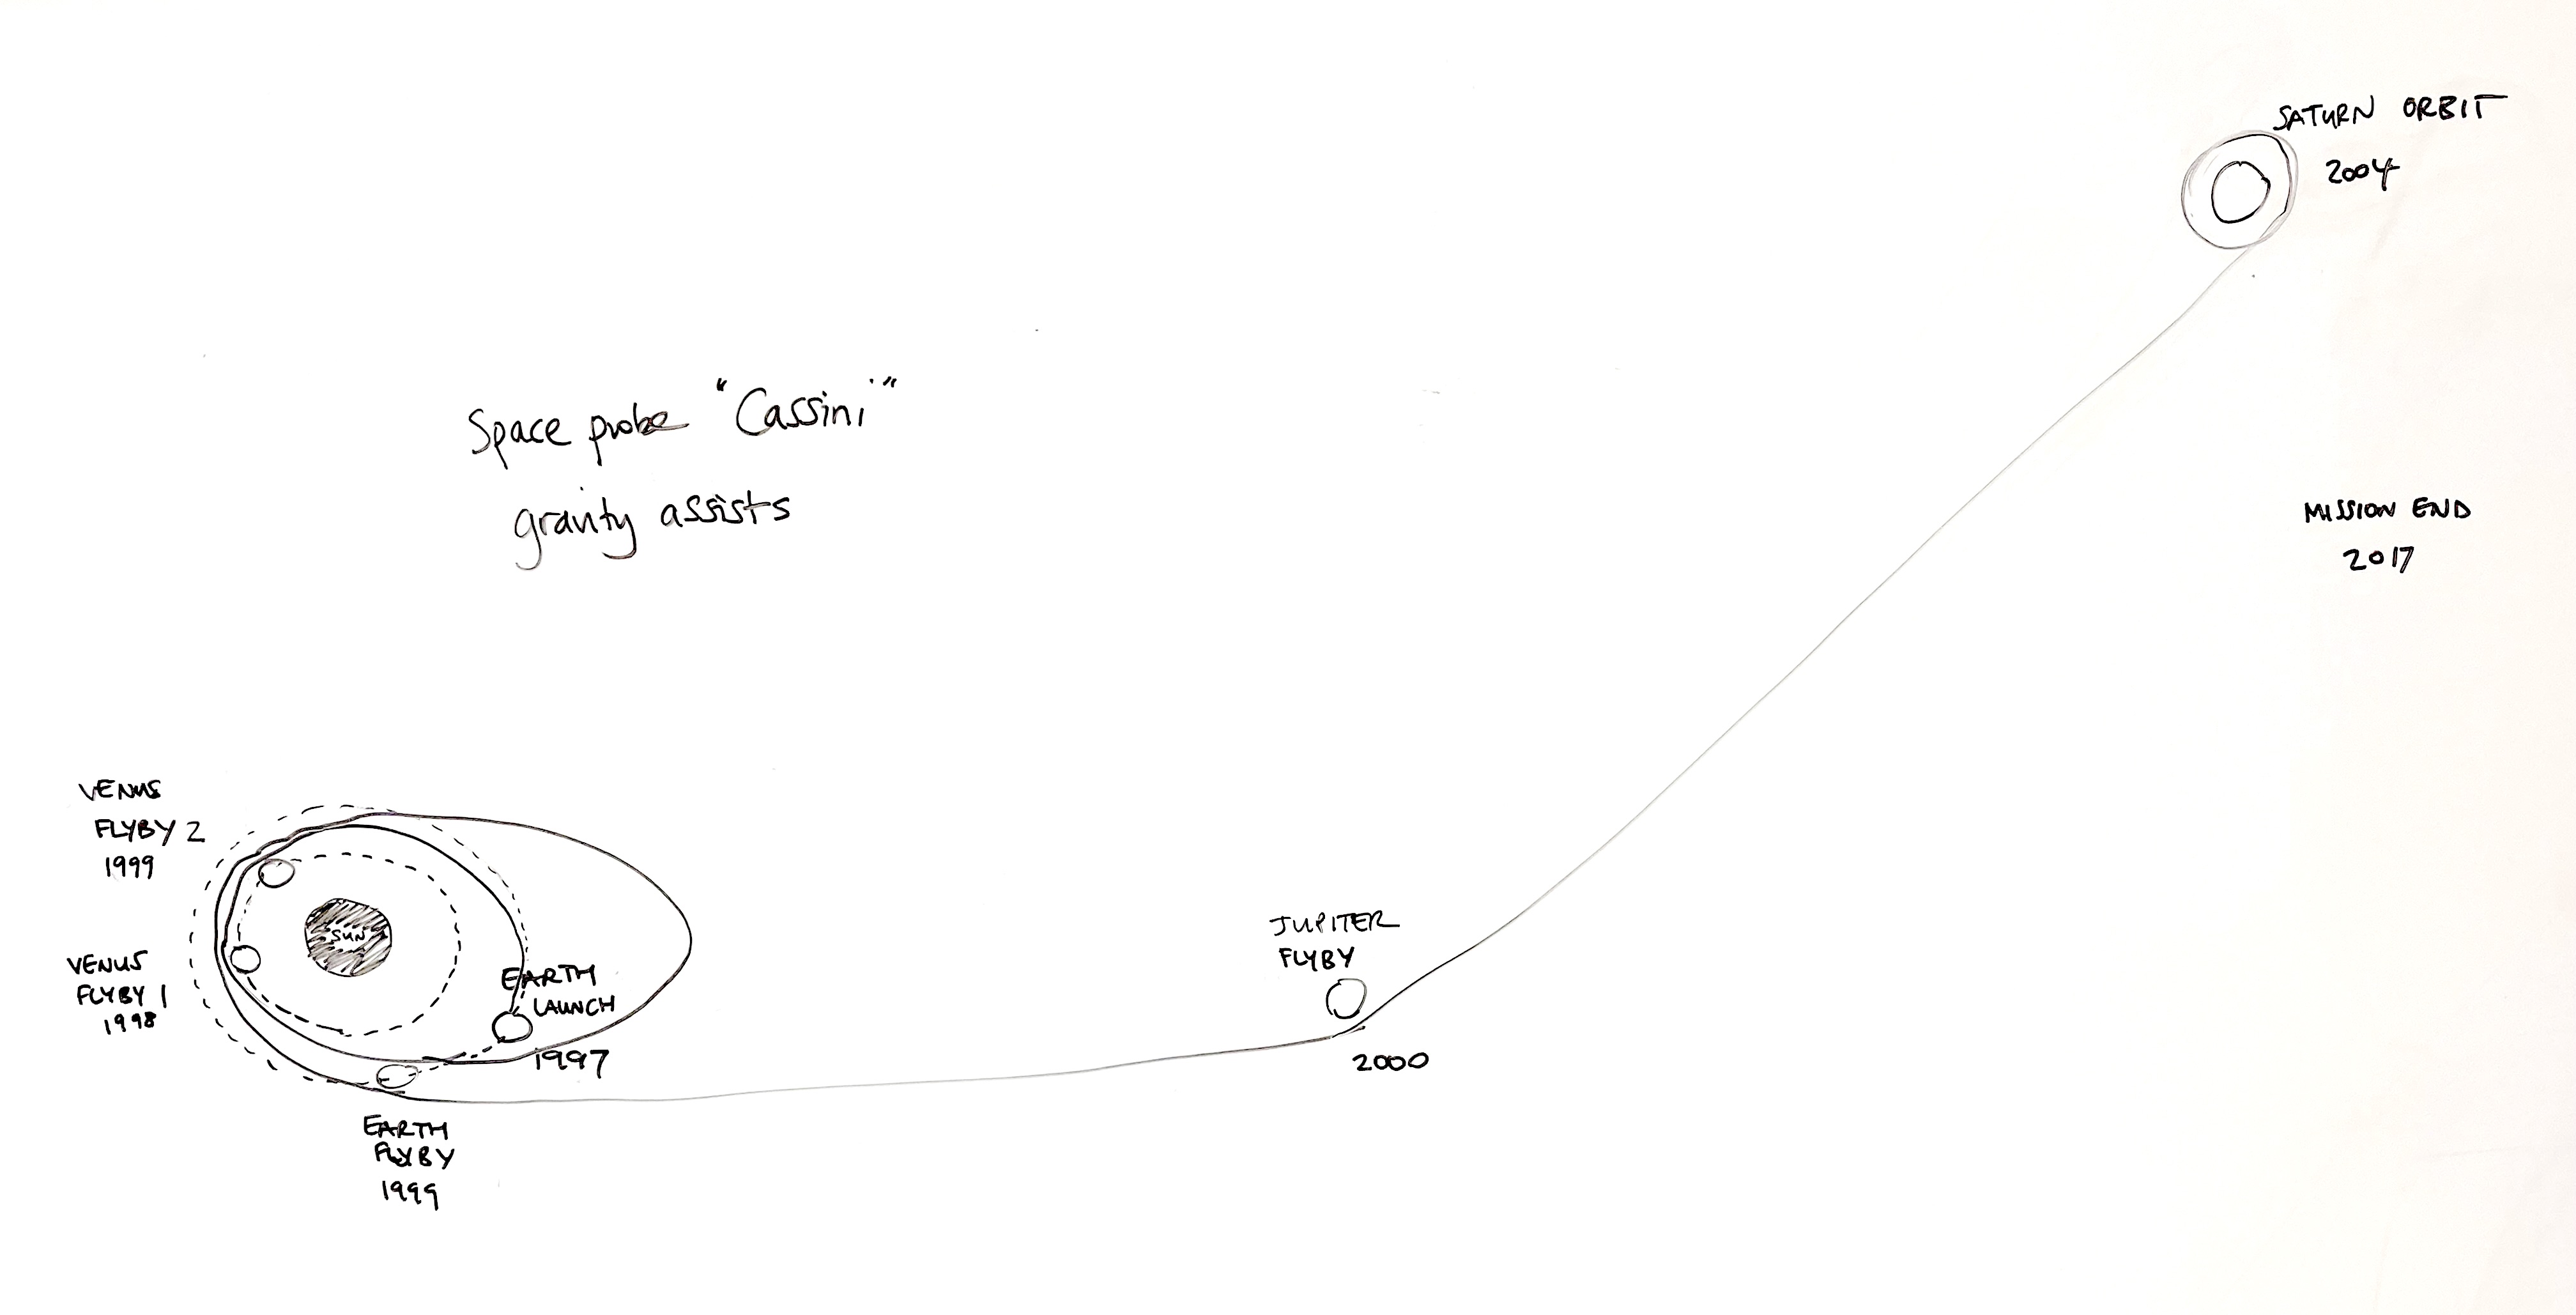
4. Cassini (see attached file) was a 20 year mission, to orbit Saturn before descending beneath the rings and into Saturn's atmosphere. It arrived at Saturn with gravity assist from Venus, Earth and Jupiter: https://science.nasa.gov/resource/cassini-trajectory/ The rocket that launched Cassini in 1997 was the most powerful available to NASA, but it still wasn't powerful enough to send the nearly 6,000-kilogram (13,200-pound) spacecraft on a direct course to Saturn. Instead, mission designers planned multiple flybys of Venus, Earth and Jupiter, using each planet's gravity to boost Cassini's sun-relative speed and send the spacecraft out to Saturn.
5. Juice (‘Jupiter Icy Moons Explorer’) was launched in 2023. It will use gravity assist of the Moon, then Earth, Venus, Earth and Earth again, then 223 Rosa (an asteroid) to get to Jupiter’s moon Ganymede in 2031. For animations of trajectory around the Sun, Jupiter and Ganymede (Jupiter Moon): https://en.wikipedia.org/wiki/Jupiter_Icy_Moons_Explorer (scroll down)
6. Artemis mission for a simple, but close to home, use of gravity assist. See the lesson plan.