ingridscience

Sounds in a box

Summary
Figure out what is inside a box by listening to the noises it makes. Optional: use as an model for how we learn about the structure of the sun's interior by listening to it.
Science topic (2005 curriculum connection)
Earth and Space Science: Stars and Planets (grade 3)
Materials
  • empty shoe boxes or plastic tubs e.g large yogurt containers
  • optional: small metal balls (to roll against the objects in the box)
  • various materials to add to the boxes e.g. metal cups, soft cloth, rice grains, or found items
  • if needed: tape to seal the boxes
Procedure

For a free play activity using found objects:
One student adds an item to the tub e.g. pine cone, leaf etc. and snaps on the lid.
Their partner tries to guess what is in the tub, by shaking it and hearing the sounds made.

For a structured activity set up by the teacher:
Before the lesson, tape different items into shoe boxes, and leave one shoe box empty. I used metal cups in one, a ball of cloth in another, and rice in another.
Add a metal ball to each box. Seal the boxes. Make sure all holes are blocked, especially for a box containing rice grains.
Ask students to tip the boxes, and deduce what is inside from the sounds they hear.

Discussion on how scientists use sound to learn about the sun:
Scientists listen to the sounds coming from the inside of the sun, to learn about its interior structure. (Called "helioseismology".)
The Sun's sound waves bounce from one side of the Sun to the other in about two hours, causing the Sun's surface to oscillate, or wiggle up and down. Because these sound waves travel underneath the Sun's surface, they are influenced by conditions inside the Sun. So scientists can listen to the sun to learn more about how the structure of the Sun's interior shapes its surface.
The Sun's sound waves are normally at frequencies too low for the human ear to hear. To be able to hear them, the scientists sped up the waves 42,000 times, and compressed 40 days of vibrations into a few seconds.
What you hear in this audio track are just a few dozen of the 10 million resonances echoing inside the Sun:
http://solar-center.stanford.edu/singing/SOUNDS/three_modes_l_0_1_2.mp3

Notes

Adapted from page 7 of http://solar-center.stanford.edu/singing/Sol_Music.pdf
Use for echolocation activity??

Grades taught
Gr 4
Gr 5
Gr 6
Gr 7

Plasma Ball

Summary
Use a plasma ball to visualize plasma, to enhance discussion that the sun is made up of plasma.
Science topic (2005 curriculum connection)
Earth and Space Science: Stars and Planets (grade 3)
Materials
  • plasma ball
Procedure

Review states of matter that the students know: often just solid, liquid and gas.
Review the spacing of the atoms/molecules in each state of matter (close in solids, further apart and free to move in liquids, even further apart and even more energetic in gases) and that in each state the particles are progressively more energetic.
Tell students that when gas is energized even more, the atoms split apart and the electrons become free from the nuclei. This is a 4th state of matter, called plasma.

In the plasma ball, plasma is produced when electrons moving at high speed (from the central electrode to the glass of the ball) bump into gas atoms and break them apart.

In the sun, the extremely high temperatures and pressure split the atoms to make plasma.

Grades taught
Gr 6
Gr 7

Seasons model

Summary
Use a light bulb and a balloon or foam ball, to model the seasons on earth as we orbit the sun.
Science topic (2005 curriculum connection)
Earth and Space Science: Stars and Planets (grade 3)
Materials
  • room that can be made at least partially dark (no direct sunlight)
  • light fixture with bulb (and extension cord) that can be placed in the centre of the room, ideally at head-height (on a desk)
  • balloon, one per student, or light-coloured alternativ (e.g. foam ball on a skewer) OR the teacher holds one and moves around the circle
  • sharpie per student/small group (OR teacher has pre-drawn landmasses on their demo)
  • optional: globe, or map, showing equator and land masses
Procedure

For classes where this activity is not to take up too much time, the teacher can demonstrate by holding the balloon/foam ball and walking around the circle.
The activity can be simplified as needed for any K-7 classroom.
The critical idea is that with the Earth's tilt, as it moves around the sun, either the Northern or the Southern hemisphere gets more or less direct light shining on it, so creating the seasons.

Blow up a balloon for each student, only half inflating it, so that it is as round as possible.
Give each student a balloon to represent earth.
Ask students to hold the balloon with the tied neck at the bottom, then to draw on the equator with a sharpie.
Then draw on a rough outline of North America, using a globe or map as a guide. Add a dot for Vancouver.
Keen students can add other places that they know/are from.
(See notes and second photo for using a foam ball on a skewer instead.)

Place the light fixture in the centre of the room, on a desk/chair so that the bulb is near head-height for standing students.
Ask the students to make a circle around the light fixture, large enough so they have good elbow room between them.
Darken the room.

Ask students to point the North Pole of their "earth" balloons towards a high feature in the room e.g. a corner. The designated feature of the room is the "Pole Star" or "North Star". With the North Pole towards the Pole Star, each earth should be tilted, ideally at an angle close to the real tilt of the earth (24 degrees from the vertical).

Ask students to position their earth in front of their bodies so that the "sun" is shining on the earth, while maintaining the tilt towards the Pole Star.
Ask students which is east and west on their earth. If they look at the continent of North America, it should help them.
Ask students to rotate the earth in the correct direction: the sun rises in the east, so the light of the bulb should hit the east coast of North America first. They will be rotating their earths counterclockwise.
For the real earth, each rotation takes one day. As the sun hits our continent it is day time and as we continue to rotate it becomes night time.

Now, we will show what happens during the year, as the Earth orbits the Sun once.
Ask students to walk in a circle around the "sun", always tilting their North Pole towards the Pole Star, while continually rotating their earth counterclockwise (as viewed from above).
Once they have walked completely around the sun and ended up back where they started, a year has passed.
Now walk through another year while asking students to keep an eye on how much sun Vancouver on their Earth receives through the year.
Ask where in the circle does Vancouver get the most time in the sun? (The northern hemisphere will be tilted towards the sun at this position in the circle.) This is the position of midsummer - the summer solstice. Mark this place in the circle with "June" (on the floor, or on the wall behind the circle).
Ask where in the circle does Vancouver get the least sun exposure? (The northern hemisphere will be tipped away from the sun at this position in the circle.)
This is midwinter, or the winter solstice. Mark this position with "December". It should be exactly across the circle from June.

(Optional:
Add that the vernal (spring) and autumnal equinoxes fall between, in March and September.
Students can locate where their birthday month falls in the circle.)

Now ask students to orbit the sun once more, with their tilted, rotating earths, and watch what happens to the north and south poles.
Each of them get sun all day for part of the year.
The sun never sets in Northern Canada in the summer as it is so close to the North Pole.

(Optional:
Discuss seasons in the northern and southern hemispheres, especially if a child in the class is from the southern hemisphere.
In the northern hemisphere, mid summer is in June, whereas in the southern hemisphere, midsummer is in December.)

To review:
In our summer, the northern hemisphere is tilted toward the sun, so has more hours of sunlight through the day (as shown by the above activity). More hours of sun exposure makes it warmer. See this image to review this point: http://www.srh.noaa.gov/srh/jetstream/global/images/seasons.jpg
In addition, the hemisphere that is tilted toward the sun also receives more direct rays of sunlight (or rays that are closer to perpendicular or a 90° angle), which means more intense radiation, so more heat. See this image to show clearly: http://astro.hopkinsschools.org/course_documents/earth_moon/earth/seaso… (backup image: http://web.gccaz.edu/~lnewman/gph111/topic_units/Earth_Sun/01_23.jpg)
The combination of more direct rays of sunlight and more hours of daylight causes the hemisphere that is tilted toward the sun to receive more solar radiation and to have warmer temperatures.

Please note:
A common misconception is that our seasons are caused by the distance from the sun. This is not the case. Our seasons are caused by the the hours of sunlight, and the angle of the sun's rays, as described above.

Notes

A foam ball on a skewer gives a more dramatic light and dark side of the earth, and the stick is good for holding and turning, but much more expensive.

Grades taught
Gr K
Gr 1
Gr 2
Gr 3
Gr 4
Gr 5
Gr 6
Gr 7

The Moon

Summary
Make a scale model of the distances between the Moon, Earth and Sun. Then study why the Moon looks like it does: model the phases of the moon, model craters, model moon dust formation.
Curriculum connection (2005 science topic)
Earth and Space Science: Stars and Planets (grade 3)
Procedure

Image of the distance between moon and earth: https://earthobservatory.nasa.gov/images/91494/right-here-right-now (The Moon is 384,400 km from Earth. It is only 40,000 km around the earth)

Choose two or three activities for a lesson.

Sun, Earth and the Moon to scale, best done outdoors across a gravel field.
Show how there is mostly empty space between the Moon and Earth, and the Sun.
To save time, build the Earth and Moon models, spaced correctly, then look out of the window to see where the sun (this exercise ball) would be.

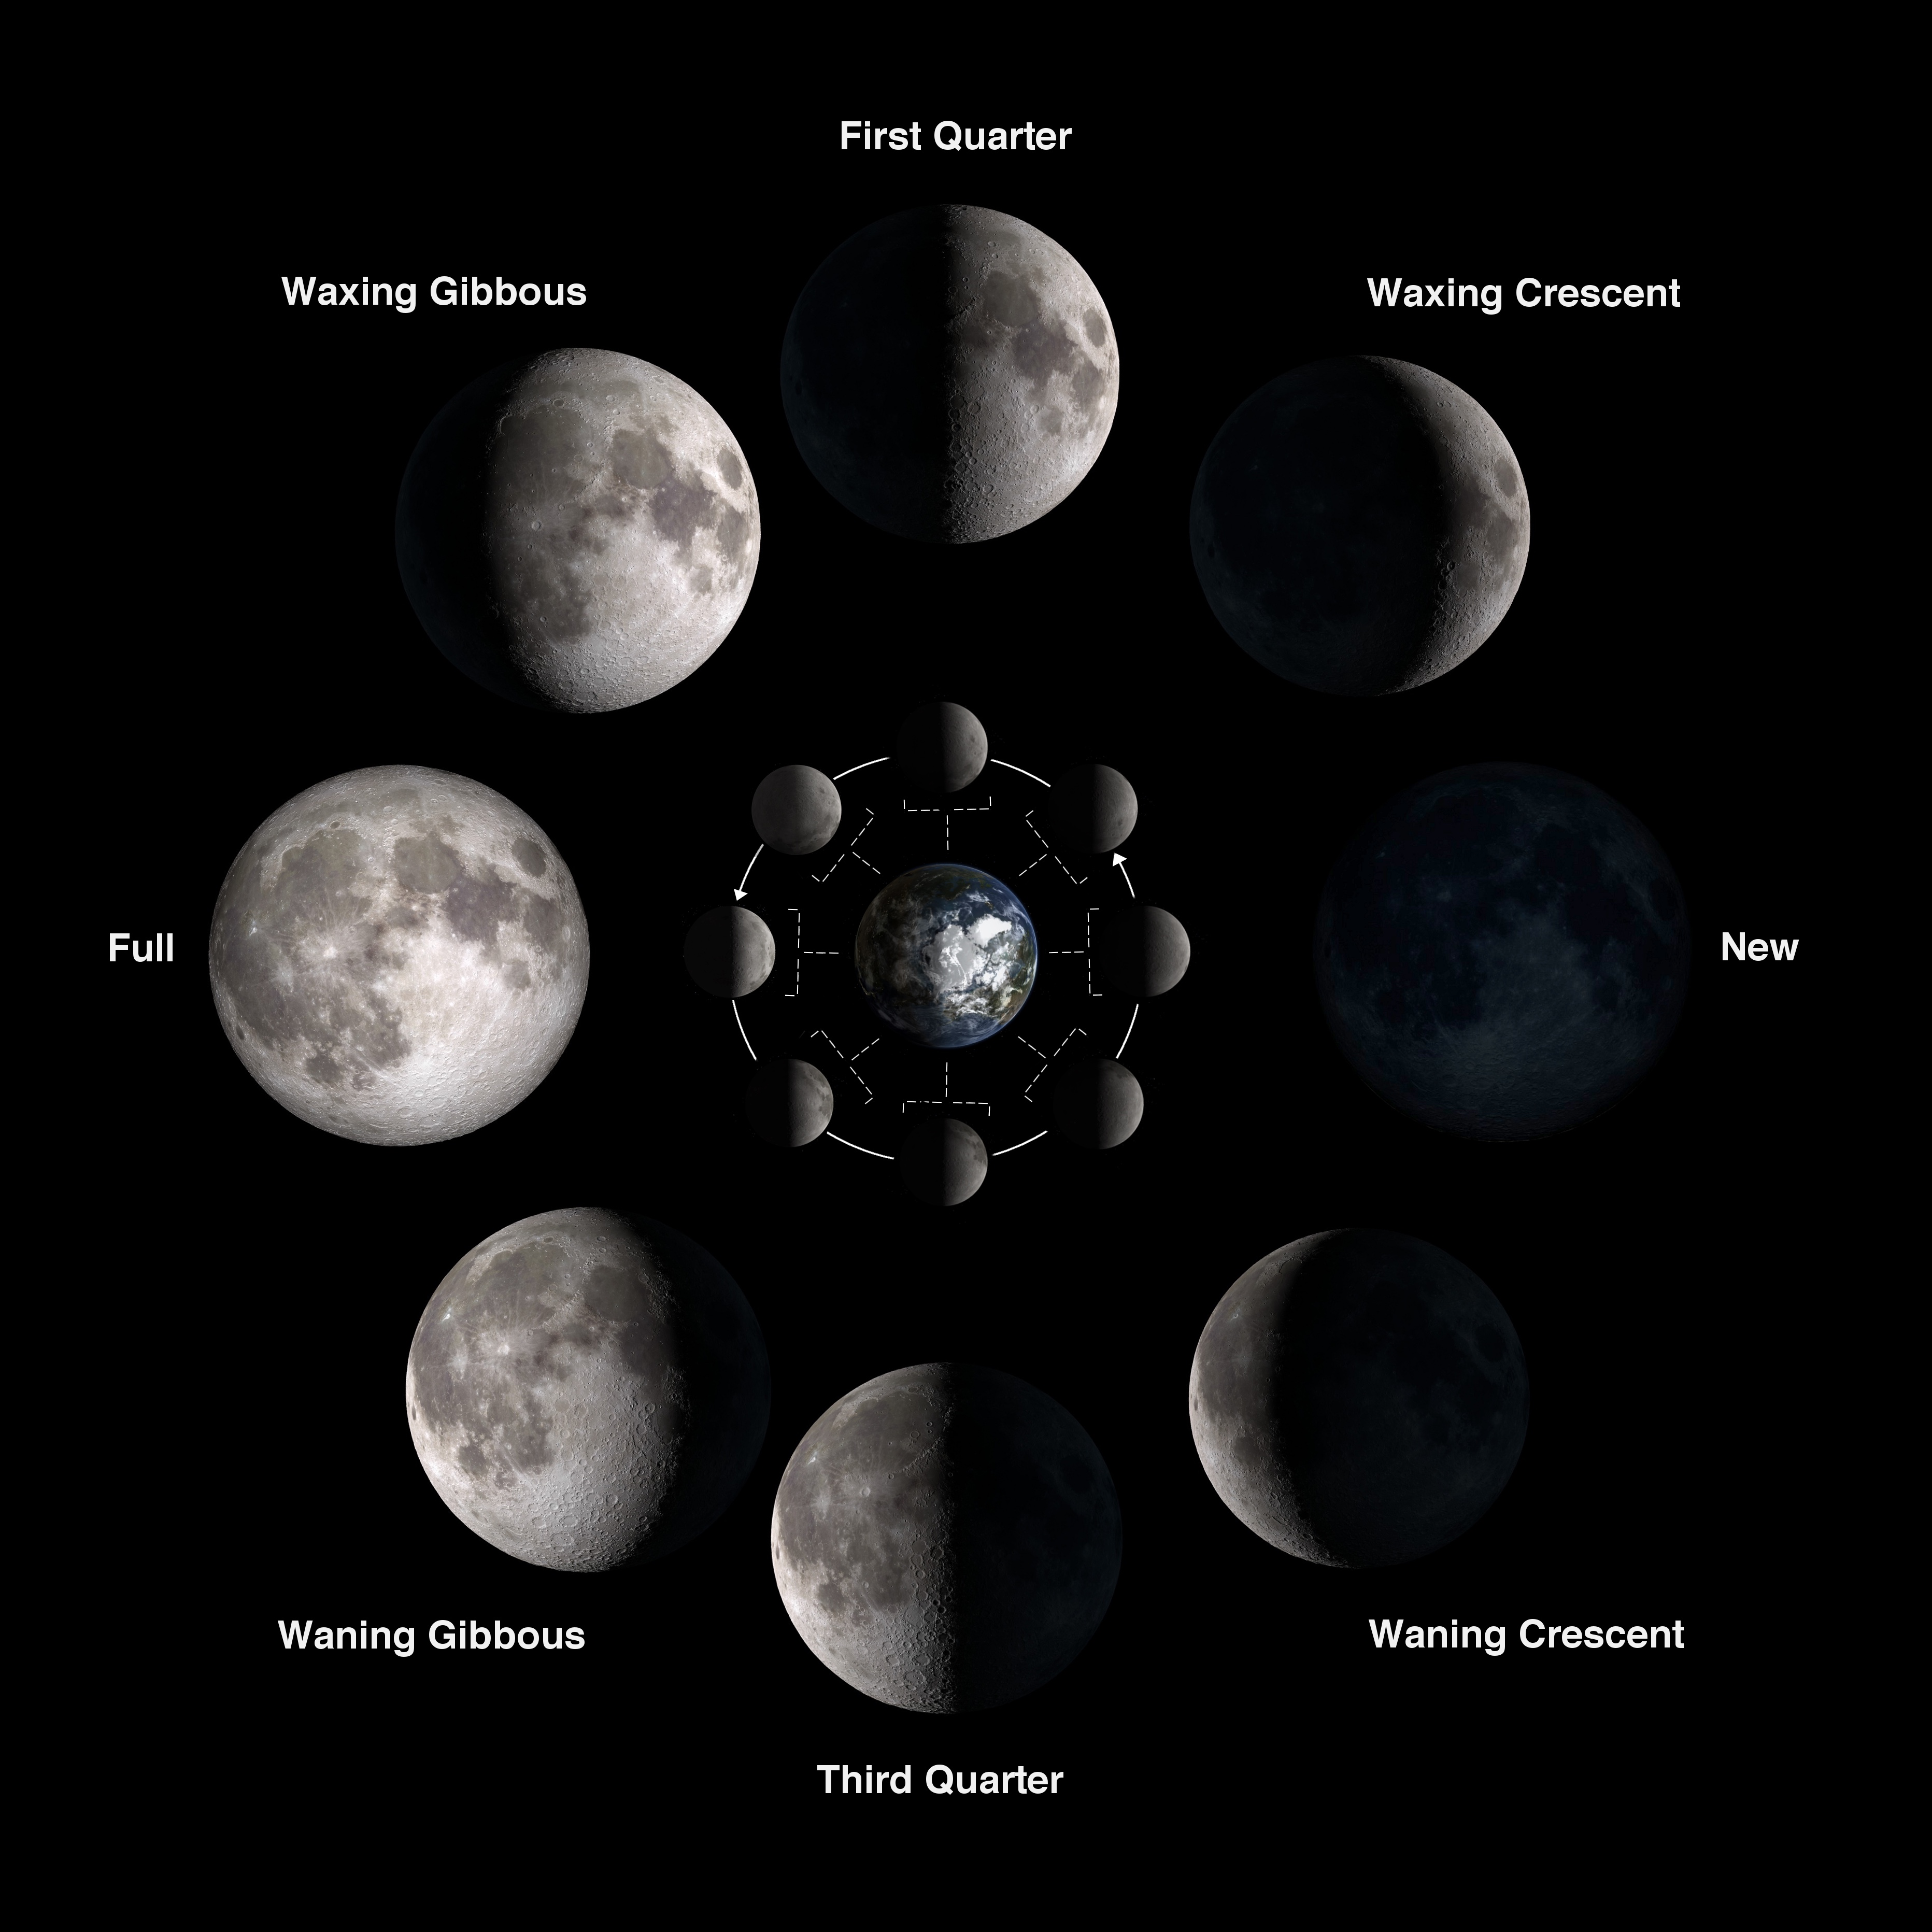
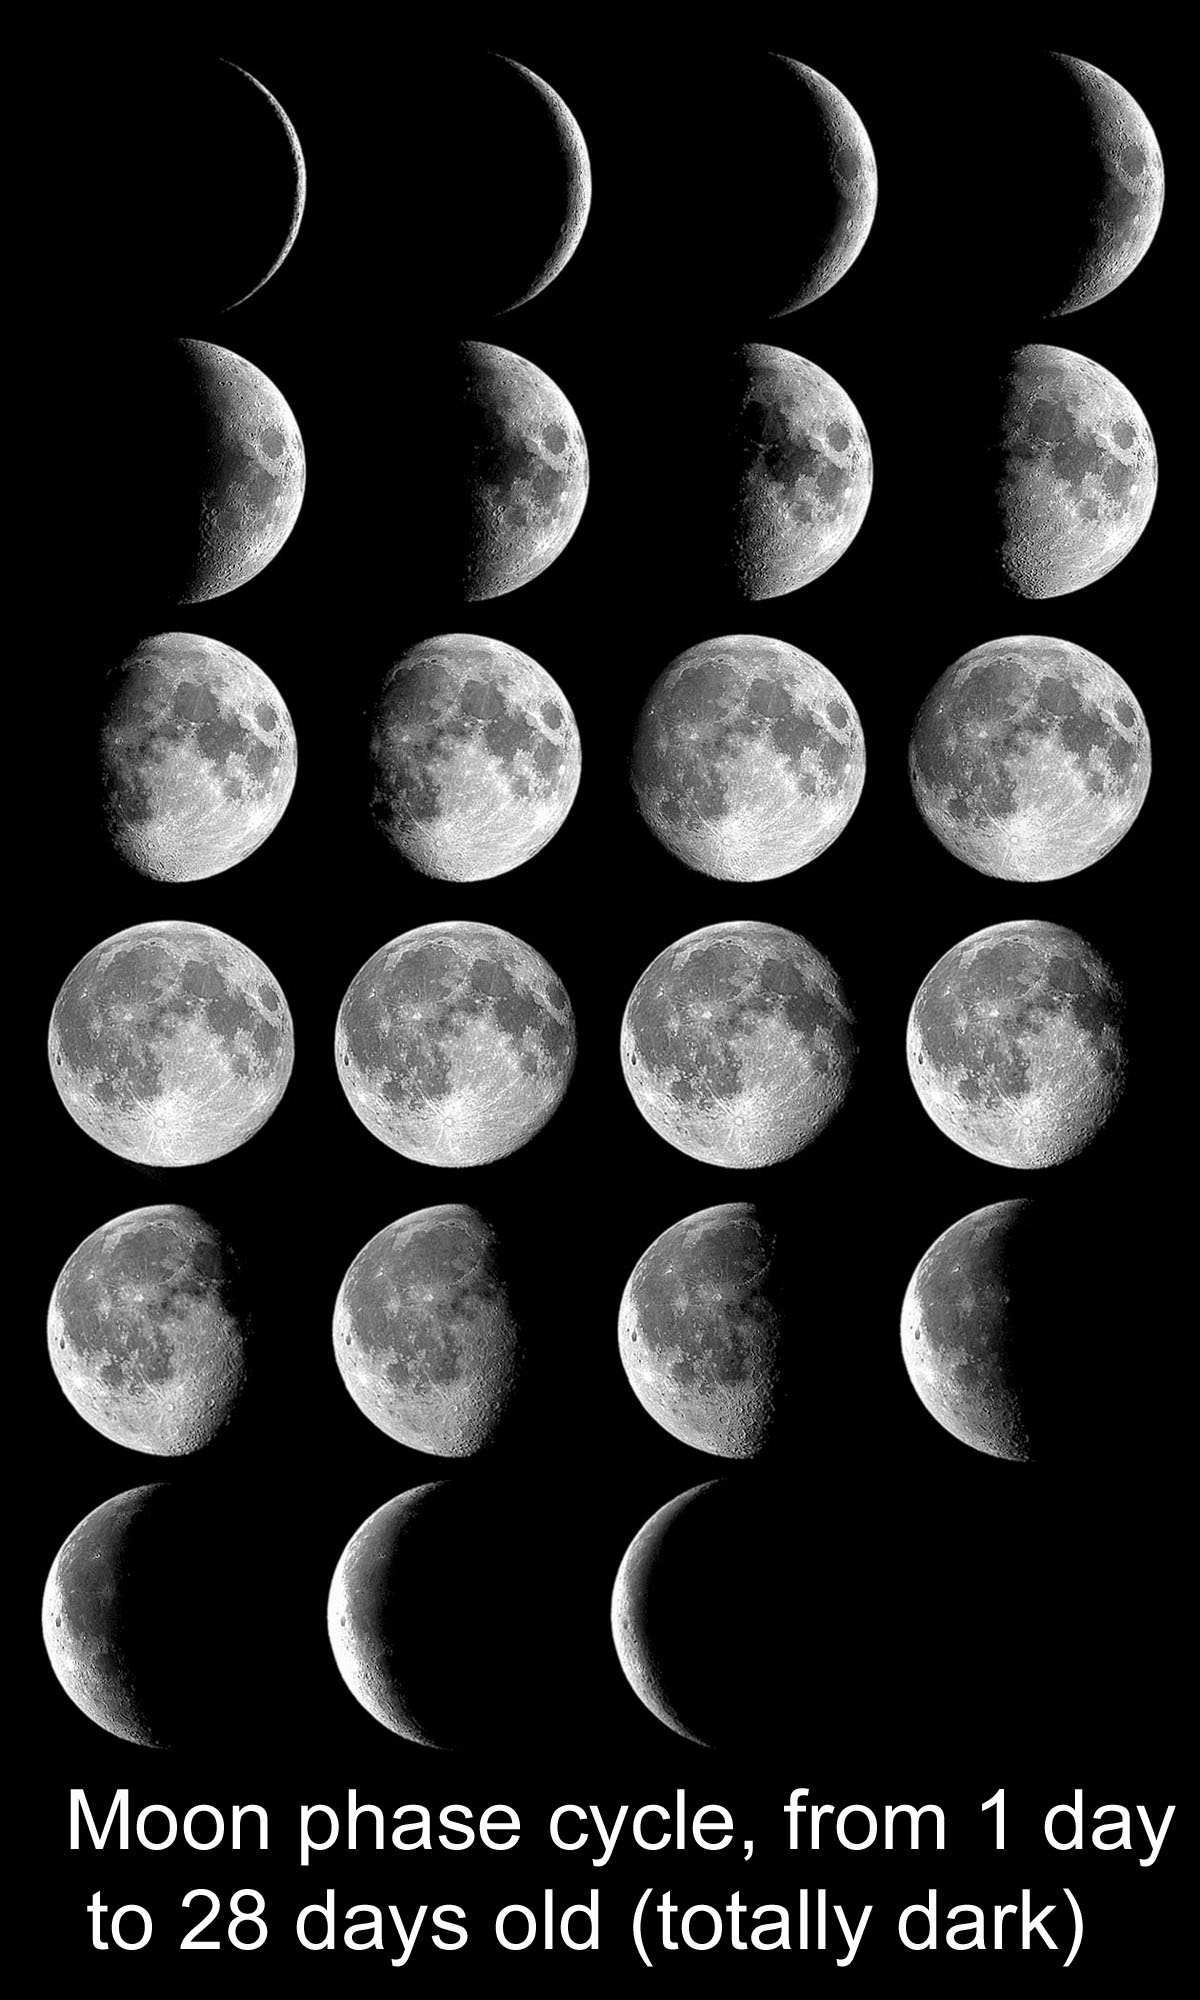
Phases of the Moon:
Show image of the phases of the moon e.g. http://solarsystem.nasa.gov/multimedia/gallery/moon_phases.png
e.g. https://spaceplace.nasa.gov/oreo-moon/en/Moon_phases_all_L.en.jpg
If a totally dark space is available (e.g. classroom with thick blinds or gym with no windows) do the Phases of the moon activity. If the classroom is lighter do the desktop phases of the moon activity.
(While in a totally dark space, also an opportunity to do the seasons demo)
To review or in combination with a phases of the moon activity, do the Moon phases puzzle:

Images on the Moon's surface:
Look closely at the moon's surface e.g. image at https://commons.wikimedia.org/wiki/File:Full_Moon_%2815984763045%29.jpg
or https://moon.nasa.gov/news/25/the-next-full-moon-is-the-flower-moon-cor…
What do you see? Different cultures see a Man, a Rabbit, or other images (http://en.wikipedia.org/wiki/Man_in_the_Moon#mediaviewer/File:Man_In_Th…)
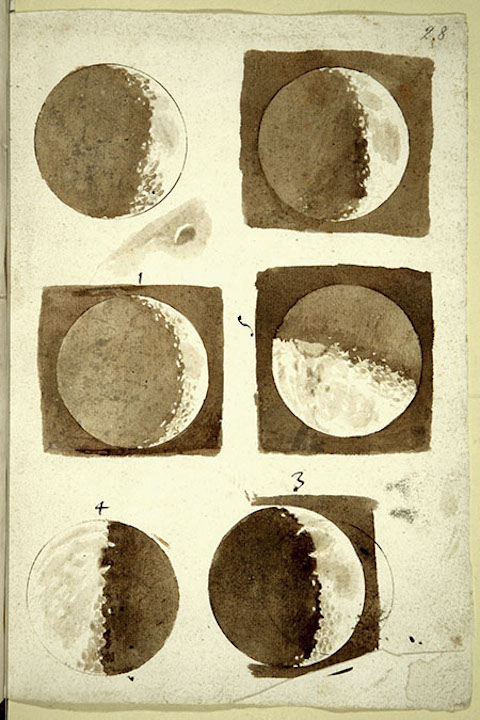
Gallileo was the first to realise that the moon was mountainous by watching the shadows changing (others thought it smooth, and also that everything revolved around the sun). In 1609. See Gallileo's paintings of the moon at http://cdn8.openculture.com/wp-content/uploads/2014/01/GalileoMoon1.jpg Now we can look a lot closer to the moon and see mountains and craters. See https://moon.nasa.gov/resources/353/wallach-crater/?category=images

Light and dark areas of the Moon:
Look at a high resolution photo of the Moon to see the dark and light areas in it. e.g. https://commons.wikimedia.org/wiki/File:Full_Moon_%2815984763045%29.jpg
We know how these features are formed - dark areas are lava flows from when the moon was younger - same rock as basalt on earth (though different composition). The light-coloured areas on the Moon are feldspar rock (specifically anorthosite).
The light from the Sun reflects off the Moon and bounces back to Earth. So ‘moonlight' is actually reflected sunlight. The dark areas of the Moon reflect less sunlight.
Reflection activity to show that the light areas of the Moon are reflecting the Sun's light, and the dark areas are not.
More details here: https://moon.nasa.gov/moon-in-motion/sun-moonlight/moonlight/#:~:text=T…)%20rocks%2C%20like%20anorthosite.
The Sun heats up the Moon’s surface to 120°C in the daytime. It can cool to -193°C at night time. (No atmosphere to spread heat around its surface, as on Earth.)

The round circles on the Moon's surface are craters from chunks of rock, or meteorites hitting the moon. All the mountains are formed by impacts, as the moon does not have tectonic plates.
Crater activity to show how the craters and their rays are formed.

We only see one side of the Moon. Tidal forces from Earth have slowed the Moon's rotation to the point where the same side is always facing the Earth.
The far side of the Moon looks quite different:
https://news.sky.com/story/the-moons-very-different-sides-explained-in-…
https://en.wikipedia.org/wiki/Far_side_of_the_Moon#/media/File:Moon_Far…
The far side is cooler and so formed a thicker crust. Meteoroid impacts on the near side would sometimes penetrate the thinner crust here and release basaltic lava that created the maria (dark patches), but would rarely do so on the far side.

Moon landing sites:
To land on the moon we needed to look much closer to map out a landing site.
Through the cameras of a probe called Ranger 9 at the Alphonsus Crater, we see the images on p.4, 5 and 6 of http://www.nasa.gov/pdf/377727main_Lunar_Math.pdf (Ranger 9 crash-landed on the moon (1965), to find a potential place for man to land on the moon).
Now there have been many moon landings (see the interactive webpage at http://moon.nasa.gov/home.cfm). (On this interactive, Ranger 9 is blue circle just lower left of centre earth-facing image.)
LRO (Lunar Reconnaissance Orbiter) is currently making a detailed study of the moon and impact analysis has found water-ice on the moon.

Moon dust:
The surface of the moon is covered in “regolith” or moon dust.
We will make regolith, then look at one of its properties that has made work on the moon challenging.
Do the Moon reglolith activity.

Gravity on the moon:
Gravity: Astronaut jumping video - gravity difference between moon and earth. www.youtube.com/watch?v=efzYblYVUFk
Feather and hammer dropped on moon: https://www.youtube.com/watch?v=KDp1tiUsZw8

Grades taught
Gr 1
Gr 2
Gr 3
Gr 4
Gr 5
Gr 6
Gr 7

Moon regolith

Summary
Simulate the formation of moon regolith ("moon dust") by banging rocks together. Experiment with its electrostatic properties, which made moon landings a challenge.
Science topic (2005 curriculum connection)
Earth and Space Science: Stars and Planets (grade 3)
Materials
  • rocks that create dust when banged together
  • goggles, or a screen to stop flying rock pieces from getting in eyes
  • shallow cardboard box or tray with a white paper lining
  • clear plexi sheet that covers the box
Procedure

The surface of the moon is covered in moon regolith (moon dust), a few metre to tens of metres deep. image at https://en.wikipedia.org/wiki/Regolith#/media/File:Apollo_11_bootprint…
Earth regolith is formed by erosion - the wind and rain brush tiny particles from rock and erodes them.
Moon has no running water and no wind - how is the regolith formed? By the impacts of meteorites.

Simulate the formation of moon regolith by banging one rock (the surface of the moon) with another rock (a meteorite).
A fine dust is formed. Collect the dust in the tray with the white lining.

To look at a property of the regolith, lay the plexi sheet over the tray of regolith, and rub a hand over it.
Students will find that the regolith jumps up to the plastic, and dances up and down, and they can spend a while experimenting. If they cannot get the dust to jump, try using a drier (non-sweaty) hand and rubbing faster (a piece of cloth may also help).
The regolith jumps because of electrostatic charges. Rubbing the plexi sheet gives it a charge, which attracts the tiny grains of regolith that are also charged.

Moon regolith is even finer (1/100 mm) than the dust made here, and also more charged (because it is bombarded by charged particles from space). When we land on the moon, the dust coats space suits, solar panels and camera lenses. (See image at http://www.space.com/18907-schmitt-covered-with-lunar-dirt.html
_GPN-2000-001124.jpg). Moon regolith is also sharp enough to wear away space suits and scratch visors. (Image of regolith magnified at https://media1.britannica.com/eb-media/30/76830-004-38A20966.jpg)
Technology has overcome some of these challenges, for example electric fields are wired on camera lenses and surfaces to attract the moon dust to the side of the lenses.

Attached documents
Notes

Regolith is a layer of loose, heterogeneous superficial material covering solid rock. It includes dust, soil, broken rock, and other related materials and is present on Earth, the Moon, Mars, some asteroids, and other terrestrial planets and moons.

Making concrete out of moon regolith, which can be used to make structures on the Moon or Mars: https://www.youtube.com/watch?time_continue=101&v=j0TPJQSmAHU

Grades taught
Gr 3
Gr 5
Gr 6
Gr 7

Flame colour

Summary
Burn different metals on a propane stove or in a camp fire, and see the colours they make.
Science topic (2005 curriculum connection)
Physical Science: Chemistry (grade 7)
Materials
  • propane camping stove
  • cork
  • straightened paper clip
  • table salt
  • if available, other metal salts e.g. potassium chloride (low sodium salt), copper sulphate, boric acid crystals
Procedure

To do the activity with a camping stove:
Push the straightened paper clip into the cork, to make a flame test tool.
Dip the wire in water, then in salt, then put it in the flame. The flame should be yellow.
Burn everything off the wire.
Dip the wire in water, then in copper sulphate if available, then put in the flame. The flame should be blue/green.
Potassium chloride, in large enough amounts of powder in the flame, burns purple.

To do the activity with a campfire:
Throw copper sulphate into the fire, to make green-blue flames.
Boric acid crystals make green flames.

The colours appear when electrons in the metals, excited by the heat, fall back to lower energy states and release light.
Fire can be different colours depending on what is burning.

Notes

Test with candle. Does the copper sulphate overcome the yellow of the candle flame?

Grades taught
Gr 3
Gr 5

Mixtures, Physical and chemical changes

Summary
Activities partnered to show age-appropriate chemistry of mixtures, physical and chemical changes.
Procedure

For lower Primaries, introduce the term Matter, which makes up everything around us (solids, liquids and gases).
When we mix things together, sometimes they make new textures.

For upper Primaries and Intermediates, introduce the term Molecules, and that they make up everything, all matter, around us.
Sometimes when we make a mixture, new molecules are made. Sometimes the molecules stay the same but just rearrange.
Physical change: the molecules stay the same.
A physical change might make something a different size, shape or texture. The molecules might rearrange, but the molecules themselves stay the same.
Sometimes things change state of matter, but it is the same molecules inside. What molecule is in the snow [water] or rain? [Water] Always water, but as a solid in snow or liquid in rain.
Chemical reaction: the molecules change.
Clues: new colour, makes heat or gets cold (temperature change), makes light, new state of matter. They are only clues to a chemical reaction occuring - you need to know what the molecules are doing to be sure.
Article with good graphic on the difference between physical and chemical changes: https://www.thoughtco.com/physical-and-chemical-changes-examples-608338

For the activities, I often start with making mixtures with chosen solids and liquids (include vinegar to see a chemical reaction), then follow with another activity focused on physical change and/or chemical reacctions.
But any activities can be paired.

Run making mixtures as a play-debrief activity, as cited in the resource.
They will make many different mixtures. Allow students time to play, during which students will tend to mix everything all together. After a while, encourage them to simplify their ingredients to find out which minimal ingredients make one type of mixture.
For the debrief, write up all that they discover, and try to tease out the different kinds of mixtures and what minimal ingredients produced the different textures, colours (and chemical change).
Optionally discuss possible activities that students might follow up with, to explore some of these changes in more detail. Guide them through the scientific process of using controls and changing one variable at a time, before returning students to their experimenting.

Talk about mixtures around us:
Our world is made of things that have been mixed together to make new useful textures and shapes. e.g. concrete is made from sand, gravel and cement (a powder of rocks including chalk, clay and iron ore). When they are combined and dried they make hard concrete that we can build with. e.g. steel playground structures are made from iron (extracted from rocks) mixed with other chemicals.

Focus on one kind of mixture:

Physical changes
Focus on flour/cornstarch and water that makes variously goopy mixtures.
There is no chemical reaction, but there is a physical change as the molecules mix together to make new textures.
Students can continue making mixtures to make and test for the best glue..
Give students a recipe for individual or a larger batch of ooblek for students to play with.
Make an Epsom salt crystal painting as the water evaporates from a solution.

Chemical reactions
Focus on baking soda and vinegar chemical reaction that makes bubbles:
Tell students we will use the same solid, baking soda, to make a soda drink or rocket.
For older students, add in molecule modelling of the reaction.
A different chemical reaction: Elephant's toothpaste demonstration, a dramatic demonstration of a chemical reaction (oxygen bleach making oxygen gas) held in a foam mixture by the dish soap.
A candle burning is a chemical change. Students can use molecule models to see the chemical reaction
Red cabbage dye is a chemical change. The colour changes are a clue that it is a chemical reaction.

Grades taught
Gr K
Gr 1
Gr 2
Gr 3
Gr 4
Gr 5
Gr 7

Mobius strips

Summary
Make mobius strips and experiment with the number of twists and what happens when you cut them in half. A fun math activity.
Materials
  • strips of paper, about 5cm wide and 30cm long
  • tape
  • pencil
Procedure

Use a strip of paper to make a mobius strip: hold the strip flat, twist one end one half turn, then tape the ends together.
How many sides does it have?
Use a pencil to draw a line down the middle of the strip, and find out that the strip has just one side.

Make other mobius strips with different number of twists and find out how many sides they have.
Record the results to find the mathematical pattern: an even number of twists gives two sides, an odd number gives one.
(See attached worksheet).

Play around with cutting mobius strips down the middle to make new loops.
Play around with joining strips together, then cutting them both down the middle (see images).

Attached documents
Grades taught
Gr 3
Gr 5

Butter molecules

Summary
Model the molecular changes as cream is turned into butter.
Science topic (2005 curriculum connection)
Life Science: Animal Growth and Changes (grade 2)
Physical Science: Chemistry (grade 7)
Materials
  • narrow, clear tube or glass
  • water to half fill tube
  • vegetable oil
  • printed images of water molecules, about 50 cut out individually
  • printed images of fat (triglyceride) molecules, about 14 cut out individually
  • printed images of water phospholipid, about 8 cut out individually
  • NOTE: the molecule mages should be in the same syle e.g. all space filling. Molecule image file attached. One set for each student pair.
Procedure

We are going to make some butter to put on the bread that is baking, and we’ll look at the molecules in that process.

Butter is made from cream. Cream has many different molecules in it, including the three in your collection. Recognize any of them?
[Water, fat and phospholipid.]

We know that fat and water don’t like to mix. Show students a tube of water, then pour in oil, and watch them separate into layers.
At the molecular level, the long tails of the fat molecules (made up of carbon and hydrogen) don’t want to be near the water molecules. (It’s because one of them has a charge [water] and one does not [fat].)

But in cream the water and fat molecules are able to mix together. Drops of fat in the water are stabilized by phospholipid molecules.
The long tails of carbon and hydrogen like to touch the fat molecules. The head has lots of red oxygen molecules, and you might also see a purple phosphorus and a blue nitrogen in there - this end of the molecule can touch water molecules.

Arrange your fat molecules into drops. Surround them with water molecules. Then add the phospholipid molecules so that they make a barrier between the fat and the water molecules, oriented so that all the molecules are stable.

You have made an emulsion, which is what cream is. Drops of liquid fat suspended in water.
This is what is in the jar of cream sitting on your desk.

In a moment we will shake the jar of cream - the emulsion drops are shaken apart and the component molecules come together with molecules they like to be with [that look like themselves]. Do the same with your molecular model.

The fat molecules join together in one big group as butter. The water separates in another group as buttermilk.
The phospholipid molecules can be part of the buttermilk as their own group, or they can surround a couple of water droplets trapped within the fat molecules (butter does have some water in it).

Now you can shake your cream to break open the fat droplets and form two separate fat and water groups: butter and buttermilk. Keep shaking until you have these two separate entities in your jar - the solid butter fat and the white liquid buttermilk.

Attached documents
Grades taught
Gr 4
Gr 5
Gr 6

Sun spot observation

Summary
Use a pair of binoculars to project an image of the sun, resolving large sunspots, on a white poster board.
Science topic (2005 curriculum connection)
Earth and Space Science: Stars and Planets (grade 3)
Materials
  • a pair of decent binoculars
  • a tripod/stable stand that the binoculars can be strapped to; angle of direction/focus ideally adjusted while attached
  • large cereal box and pair of scissors
  • large white foam core sheet/poster board
Procedure

Set up the binoculars as in the first image, with once eyepiece poking through the cereal box.
Stand them on the tripod about 1m away from the board.
Adjust the angle of the binoculars so that the sun's image is projected on the board, then focus so that it is clear.
If you are lucky you will see dark spots on the face of the sun.
Check http://www.tesis.lebedev.ru/en/active_areas.html to find out what you should be looking for.

Sunspots are caused by strong magnetic fields that block heat coming from the inside of the sun, which allows the region above to cool (to 3700°C). They have a darker core, "umbra", surrounded by a lighter "penumbra" and are often larger than the Earth.

They move across the surface of the visible side of the sun as the sun rotates (about once every 2 weeks/month?).
By the time that area of the sun has come around again, the sunspot activity has changed.

Notes

The sun cycles through periods of low and high sunspot activity. We are in cycle 24, heading towards a low in 2020, before activity increases again.

Grades taught
Gr 3
Gr 5