ingridscience

Spirograph modeling orbit precession

Summary
Use spirograph art to model how orbits go through precession (the orbit slowly rotates around the central body).
Materials
  • spirograph set
  • ballpoint pens
  • paper
Procedure

We usually think of the orbit of a body in space to be fixed, but 'apsidal precession' of orbits (slow rotation of the orbit path) has been observed - see image here: https://en.wikipedia.org/wiki/Apsidal_precession#/media/File:Perihelion…

Most planets in the solar system have apsidal precession, but at a very slow rate, so their orbits are almost stationary.
https://en.wikipedia.org/wiki/Apsidal_precession

Show students orbit precession images. Note that drawings of precession are highly exaggerated - the actual shift on each orbit is very small and only observed after watching an orbiting body for many years.

Lunar precession of the Moon around Earth image (exaggerated): https://en.wikipedia.org/wiki/Lunar_precession#/media/File:Moon_apsidal…
Animations of lunar precession at https://en.wikipedia.org/wiki/Lunar_precession

A star, called S2, orbiting Sagittarius A* (the black hole at the centre of the Milky Way) has been observed for 27 years to notice precession: https://newatlas.com/space/star-s2-spirograph-orbit-supermassive-black-…

Students make art with a spirograph to model the patterns made by precession of orbiting bodies.

Grades taught
Gr 4
Gr 5
Gr 6

Lung model

Summary
Make a simple model of a lung, to show how the lungs inflate when the diaphragm muscle moves down and increases the volume of the chest cavity.
Materials
  • sturdy personal drink bottle e.g. gatorade, vitamin water
  • blade or saw to cut drink bottle
  • sand paper to smooth sharp bottle edges
  • two balloons
  • scissors
Procedure

Prepare the bottle and one balloon before the lesson:
Saw or cut the drink bottle so that the distance from neck to the cut is about the length of a deflated balloon. Sand the cut edge, so that it doesn't pierce a balloon later.
Tie a knot in the neck of one balloon, then cut the tip off the other end (the rounded part).

Distribute materials to each student: a cut bottle, one knotted and cut balloon, one whole balloon.
Have a partner hold the bottle, or stabilize it between the knees, with the bottle mouth pointing upwards.
Push the rounded main part of the intact balloon into the mouth of the bottle, then stretch the neck over the bottle mouth to secure it. The balloon should hang down in the bottle, with a hole into it at the mouth of the bottle.
Turn the bottle the other way up and stabilize, with the cut end of the bottle pointing upwards.
Stretch the open end of the knotted balloon over the cut end of the bottle, so that it is secure with the knot outwards.

Work the lung model:
The balloon hanging in the bottle is a lung (the physics is the same even though there are not two lungs).
The knotted ballon covering the cut end of the bottle is the diaphragm muscle.
Push the knot upwards so the diaphragm goes up into the bottle. This is the position of the diaphragm when it is relaxed. The lung should crumple and have no air in it.
Pull the knot downwards so the diaphragm ballon is pulled away from the bottle. This is the position of the diaphragm when it is contracted (it is actually straight across, not pulled down). The lung should inflate with air, fully or partially,

This model shows that we do not actively suck air into, or push air out of, our lungs (as it feels like). Air flows in and out of the lungs as the diaphragm muscle changes shape and the chest cavity changes size.
When the diaphragm contracts, it moves downwards, which increases the volume of the chest cavity, which decreases the air pressure in the chest cavity. Atmospheric air rushes into the lungs to equalize the pressure.
When the diaphragm relaxes again, it curves upwards, which decreases the volume of the chest cavity, so increasing the air pressure. Air leaves the lungs to equalize pressure.
In addition, when we breathe in, our rib muscles also move our rib cage up and outwards, further increasing the chest cavity, and making even more atmospheric air rush in.

Lung breathing gif:
Clear image of lungs and diaphragm only - https://upload.wikimedia.org/wikipedia/commons/9/9c/Diaphragmatic_breat… (but incorrect in that the same molecules enter and leave the lungs).
Shows diaphragm and ribs moving - https://www.luanamaso.com/wp-content/uploads/2019/09/AdolescentTastyFel…
Also shows heart and intestine - https://giphy.com/gifs/body-systems-organs-lckhIaarcbT20CXRDo

Grades taught
Gr 4
Gr 5
Gr 6

Plant bud hunt

Summary
In the cold months, go outside and find buds - flower, leaf or shoot buds. Notice their arrangement - opposite or alternate.
Materials
  • Outside area with bushes or trees
  • Optional: magnifiers
  • Optional: drawing materials
Procedure

Go outside in the winter months, and look for buds on plants.
Buds are a protected flower, leaf or shoot, formed in the Fall. They protect delicate plant parts over the winter, and will open up in the Spring when it is warmer and sunnier.

Grades taught
Gr K
Gr 1
Gr 2
Gr 3

Weather and Seasons

Summary
Model/discuss why we get seasons. Activities on weather. Model seasonal Indigenous food gathering.
Materials

Materials in the activities

Procedure

Lesson on Seasons and seasonal Indigenous food harvesting (good for Ks):
Measure temperature using coloured sheets and wind at two stations.
Discuss how the weather changes with the season.
Discuss how Indigenous harvesting methods change with the season, and model clam baskets.

Lesson on Weather for grade 1s:
Model why we get seasons.
Set up frost.
Two stations to measure temperature using thermometers and wind.
Lightening model

Grades taught
Gr K
Gr 1

Physical changes in Buttered popcorn

Summary
Make butter and popcorn, discussing the physical changes in each. Act out what the molecules are doing as popcorn pops.
Materials

Materials in the activities

Procedure

Act out molecules, so that students are familiar with what the particles are doing in solids, liquids and gases.

Make butter in a circle together, describing each stage in physical terms.
Cream has fat molecules floating in a watery white liquid (the white is casein protein clumps).
Shake the cream in a jar, to shake in air bubbles. Whipped cream is formed (open the jar to show). The molecules are the same but are reorganized - there are now bubbles of air molecules mixed in with the fat and water molecules of the cream.
As we shake more, the fat molecules in the cream gather together to make one big lump - butter!
The proteins and milk sugar molecules mix in with the water molecules, to make 'buttermilk'.

Make popcorn.
While the teacher is preparing the popcorn, watch video of popcorn kernals bursting open in slow motion.

Then students can either prepare a skit to show what the molecules are doing as popcorn pops.
Or students can measure temperature in water of different states then graph. After graphing tell students that popcorn pops when the inside water reaches 180 centigrade!

Dump the popcorn in a large bowl to salt it, and put the butter in the still-warm pot to melt it.
Pour melted butter over the popcorn, then distribute buttered popcorn in little cups.

Grades taught
Gr 2
Gr 3
Gr 6
Gr 7

Heat radiation lamp

Summary
Use an infrared heat lamp to demonstrate heat transfer by radiation. Add in heat sensitive sheets to add in heat transfer by conduction.
Materials
  • infra red lamp, 250W, like this one - 3 for a class
  • fixtures for the lamps, with extension cords
  • small sheet of glass
  • small sheet of plexi
  • cardstock
  • small piece of foam core
  • optional (be careful): garbage bag
  • plastic box
  • water
  • mirror
  • not essential but adds a free play element: heat sensitive sheets
  • shields to keep students at least 20cm from the lamps (so they don't destroy the heat sensitive sheets) - cardboard shield idea pictured
  • large binder clips and duct tape to secure fixtures
  • IR images (see procedure for links)
Procedure

Review/summarize the ways that heat (thermal energy) moves:
Radiation can travel through empty space. We feel the radiation from the sun. Heat radiation is called Infra red. (Note that there are other kinds of radiation.)
Conduction and convection need particles. Conduction is the transfer of heat between things that are touching. Convection only happens in a liquid or gas, and is the movement of the particles themselves, carrying their heat energy with them.

Heat radiation demonstration
Best done in a circle, with an infra red heat lamp on a fixture that can be picked up by the teacher.
Tell the students that this lamp gives off some light, to show us where the heat is directed (which we can see) and heat (which we can't see).
Turn the lamp on and shine it briefly on each of the students' hands, so that they can feel the heat coming from the bulb.
Although we can't see heat radiation, we can still sense it - we can feel it.
The sun gives off radiation. Radiation can travel through space with no air.
(An old-style incandescent bulb also gives off a lot of heat, mostly by radiation. This waste of energy, when we want light, is why we have phased out incandescent bulbs.)

Look at infra red (IR) images together
Many materials give off heat radiation. IR cameras detect heat and convert the image to colours, so we can see where the most heat is.
Car: https://upload.wikimedia.org/wikipedia/commons/d/d6/IR_moving_car.jpg
Dog: https://animalwellnessmagazine.com/dogs-noses-detect-heat/
House: https://tedkinsman.photoshelter.com/image/I00000BT15x1yhIQ or https://www.loe.org/shows/segments.html?programID=12-P13-00046&segmentI…
Water rescue (scroll down): https://www.flir.com/discover/marine/first-respondents/maritime-public-…
Andromeda galaxy (4th image down): https://svs.gsfc.nasa.gov/30990

Heat radiation can pass through some materials and not others
Use heat sensitive paper to show heat. As it heats up the heat sensitive sheet turns from black to red, orange, yellow, green, blue, then black again. Demonstrate that the sheet turns colours when placed near the infra red heat lamp.
Does radiation pass through glass - do you get warm through a window? (It might be hard to remember, or separate what you remember from what you think should happen.) [Yes] Show with the heat sensitive sheet on the other side of the glass from the lamp.
Does radiation pass through plastic? Show with plexi sheet. [Yes]
Cardboard? [No]
Through water? Show it does pass through the plastic box, then add water to the box.

Just like visible light, infra red heat radiation can bounce off mirrors.
Hold the mirror so that infra red from the heat lamp reflects off the mirror and onto the heat sensitive sheet.

Free play radiation and conduction
Before the lesson: Space the the heat lamps around the classroom, minimizing wires to be tripped over (as students will be walking around the classroom a lot).
Before the lesson: Set up a shield so that the students cannot bring a heat sensitive sheet closer than 20cm to the lamp.
Hand heat sensitive sheets to students, and allow them to explore them for a while.
Discuss how heat moves from your hand to the sheet, to make it turn colours. Your hand and the sheet are touching - the heat moves between them by conduction.
Air is also touching the sheet and conducts heat away from it - there are molecules in the air that bounce into the sheet and take some of its energy and cool it down again.

Show students how to charge their sheet with the radiation from the heat lamp. Include a shield around the lamp, so students don't hold them too close and destroy them.
Then quickly touch it to materials in the classroom, to see how the heat leaves the sheet by conduction. Make sure the coloured side of the sheet is up, so you can see it change.
Allow students to explore.
After the radiation from the heat lamp heated the sheet up, which materials in the classroom conducted the heat away quickly, and which ones slowly? What patterns did you make on your heat sensitive sheets, when different parts of an object took heat away at different rates?

Notes

Need half hour to set up heat lamp charging stations for heat sensitive sheets

Grades taught
Gr 2
Gr 3
Gr 4

Animal adaptations for Primaries

Summary
Choose activities from modeling how different animals eat, comparing animal skulls and skeletons, build animals with fins and wings.
Procedure

Set up activities as stations or for the whole class to work on.

Introduction and focus
Animals need to 1. find food, and 2. run away and hide from other animals that want to eat them.
Animal 'adaptations', or their features help them do this so that they can stay alive.

Activity descriptions:

In a circle, carefully pass around prey and predator skulls, looking at the shape of the teeth, then the placement of the eyes, and for how they help an animal find food, and escape being eaten.

Model different ways that animals eat with animal eating styles activity (grabbing, stabbing, sucking, sieving).
Review the different tools that students tried with images of animals eating in the different ways.

Find camouflaged animals in photos. Camouflage helps animals hide from predators, as well as hiding to get closer to prey.

Some animals don't have legs. They have wings (like a bird) or fins (like a fish).
Build fins and wings onto playdough bodies to create your own winged/finned animal.
Look at a sheet of birds and fish drawings for real examples and ideas.

Build a skeleton of a deer or look at a snake skeleton. Compare how the skeleton is different from ours, and how each of our skeletons help us survive.

Look at barnacles feeding - they don't have legs and they can't move, but they have their own adaptations to eat and survive.

Look at pictures of different animal eyes - so many shapes and colours, but all for seeing surroundings, finding food and avoiding predators.
e.g. https://commons.wikimedia.org/wiki/File:Animal-Eyes.jpg (but no labels!)

Grades taught
Gr K
Gr 1
Gr 2
Gr 3

Earth, Sun and Moon Positions and their Effects

Summary
Model the Phases of the Moon and the Seasons. Activities on the effects of the Seasons on living things.
Materials
  • Space that can be made completely dark
  • Materials in the activities
Procedure

Activity sequence idea 1:
Scale model of Sun/Earth/Moon
Visualise a complete rotation of the Moon around the Earth, through the seasons.
Seasons model demo
Phases of the Moon activity

Activity sequence idea 2:
Scale model of Sun/Earth/Moon
Model how the Moon causes tides as its gravity pulls on the oceans.
Show barnacles feeding as they are submerged by water, as when the tide comes in.

Activity sequence 3:
Leaves turn colours before they drop from trees in the Fall. What colours do we see?
One of these colours is in leaves all year but is hidden until the green disappears in the Fall.
We’ll use a technique to separate out the colours in leaves, so we can find the hidden colour.
Set up leaf colours.
Move to a dark area in the school (gym with no windows/basement/behind curtains on a stage).
Demonstrate why we get
seasons.
Because the Earth is tilted, the amount of sunlight reaching Canada in the Northern hemisphere changes through the year. In the summer we are tilted towards the sun, in the winter we are tilted away. (The Southern hemisphere is the opposite, so has summer and winter at opposite times of year from us.)
Model why the Moon looks different at different times of the month with Phases of the Moon activity.
Leaf colours revisit and discussion.
Green leaves have green and yellow pigments in them.
In the summer leaves are green. They also contain yellow pigment but it is masked by the green.
In the fall, as the leaf starts to die in preparation for falling off, the green pigment breaks down and loses its colour. The yellow colour then becomes visible. So some fall leaves turn yellow. (The red colour of other Fall leaves are by a different mechanism.)

One way that animals adapt for the winter is making a new coat of thicker feathers or fur, to keep them warm in the colder months.
Some animals also change the colour of their fur/feather colours between summer and winter, so that they are better camouflaged in each season. Look at photos e.g. ptarmigan birds in summer and winter.

Indigenous groups, such as the Musqueam, Squamish, and Tsleil-Waututh First Nations, who’s land we are on, have a traditional ‘Seasonal Round’, to harvest food and make tools when each food/material becomes abundant in each season.
Optionally use this poster: https://www.vashonheritagemuseum.org/shop/p/coast-salish-seasonal-round…

Notes

Other Effects to include in this lesson:
Animals adapting to winter - feather, fur activities (look up close for function?)
Hibernation/migration
Tides and effects on animals - see Moon lesson
Nocturnal/Diurnal animals?

Grades taught
Gr 1
Gr 2
Gr 3
Gr 4

Nitrogen cycle through salmon to trees

Summary
Follow the nitrogen as it breaks down from salmon flesh to ammonia (ammonification). Plants can absorb ammonia from soil.
Procedure

Salmon bring nitrogen from the ocean into the temperate rainforest of the Pacific Northwest.
This activity shows how using molecule models.

Spawning salmon swim upstream, into the forests of the Pacific Northwest.
They either die on the river banks after spawning, or are caught by animals and taken into the forest to be eaten. Carcasses are left behind by bears, coyotes, cougars, racoons, eagles, crows etc.

See what happens to the salmon's carcass as it decomposes on the forest floor:
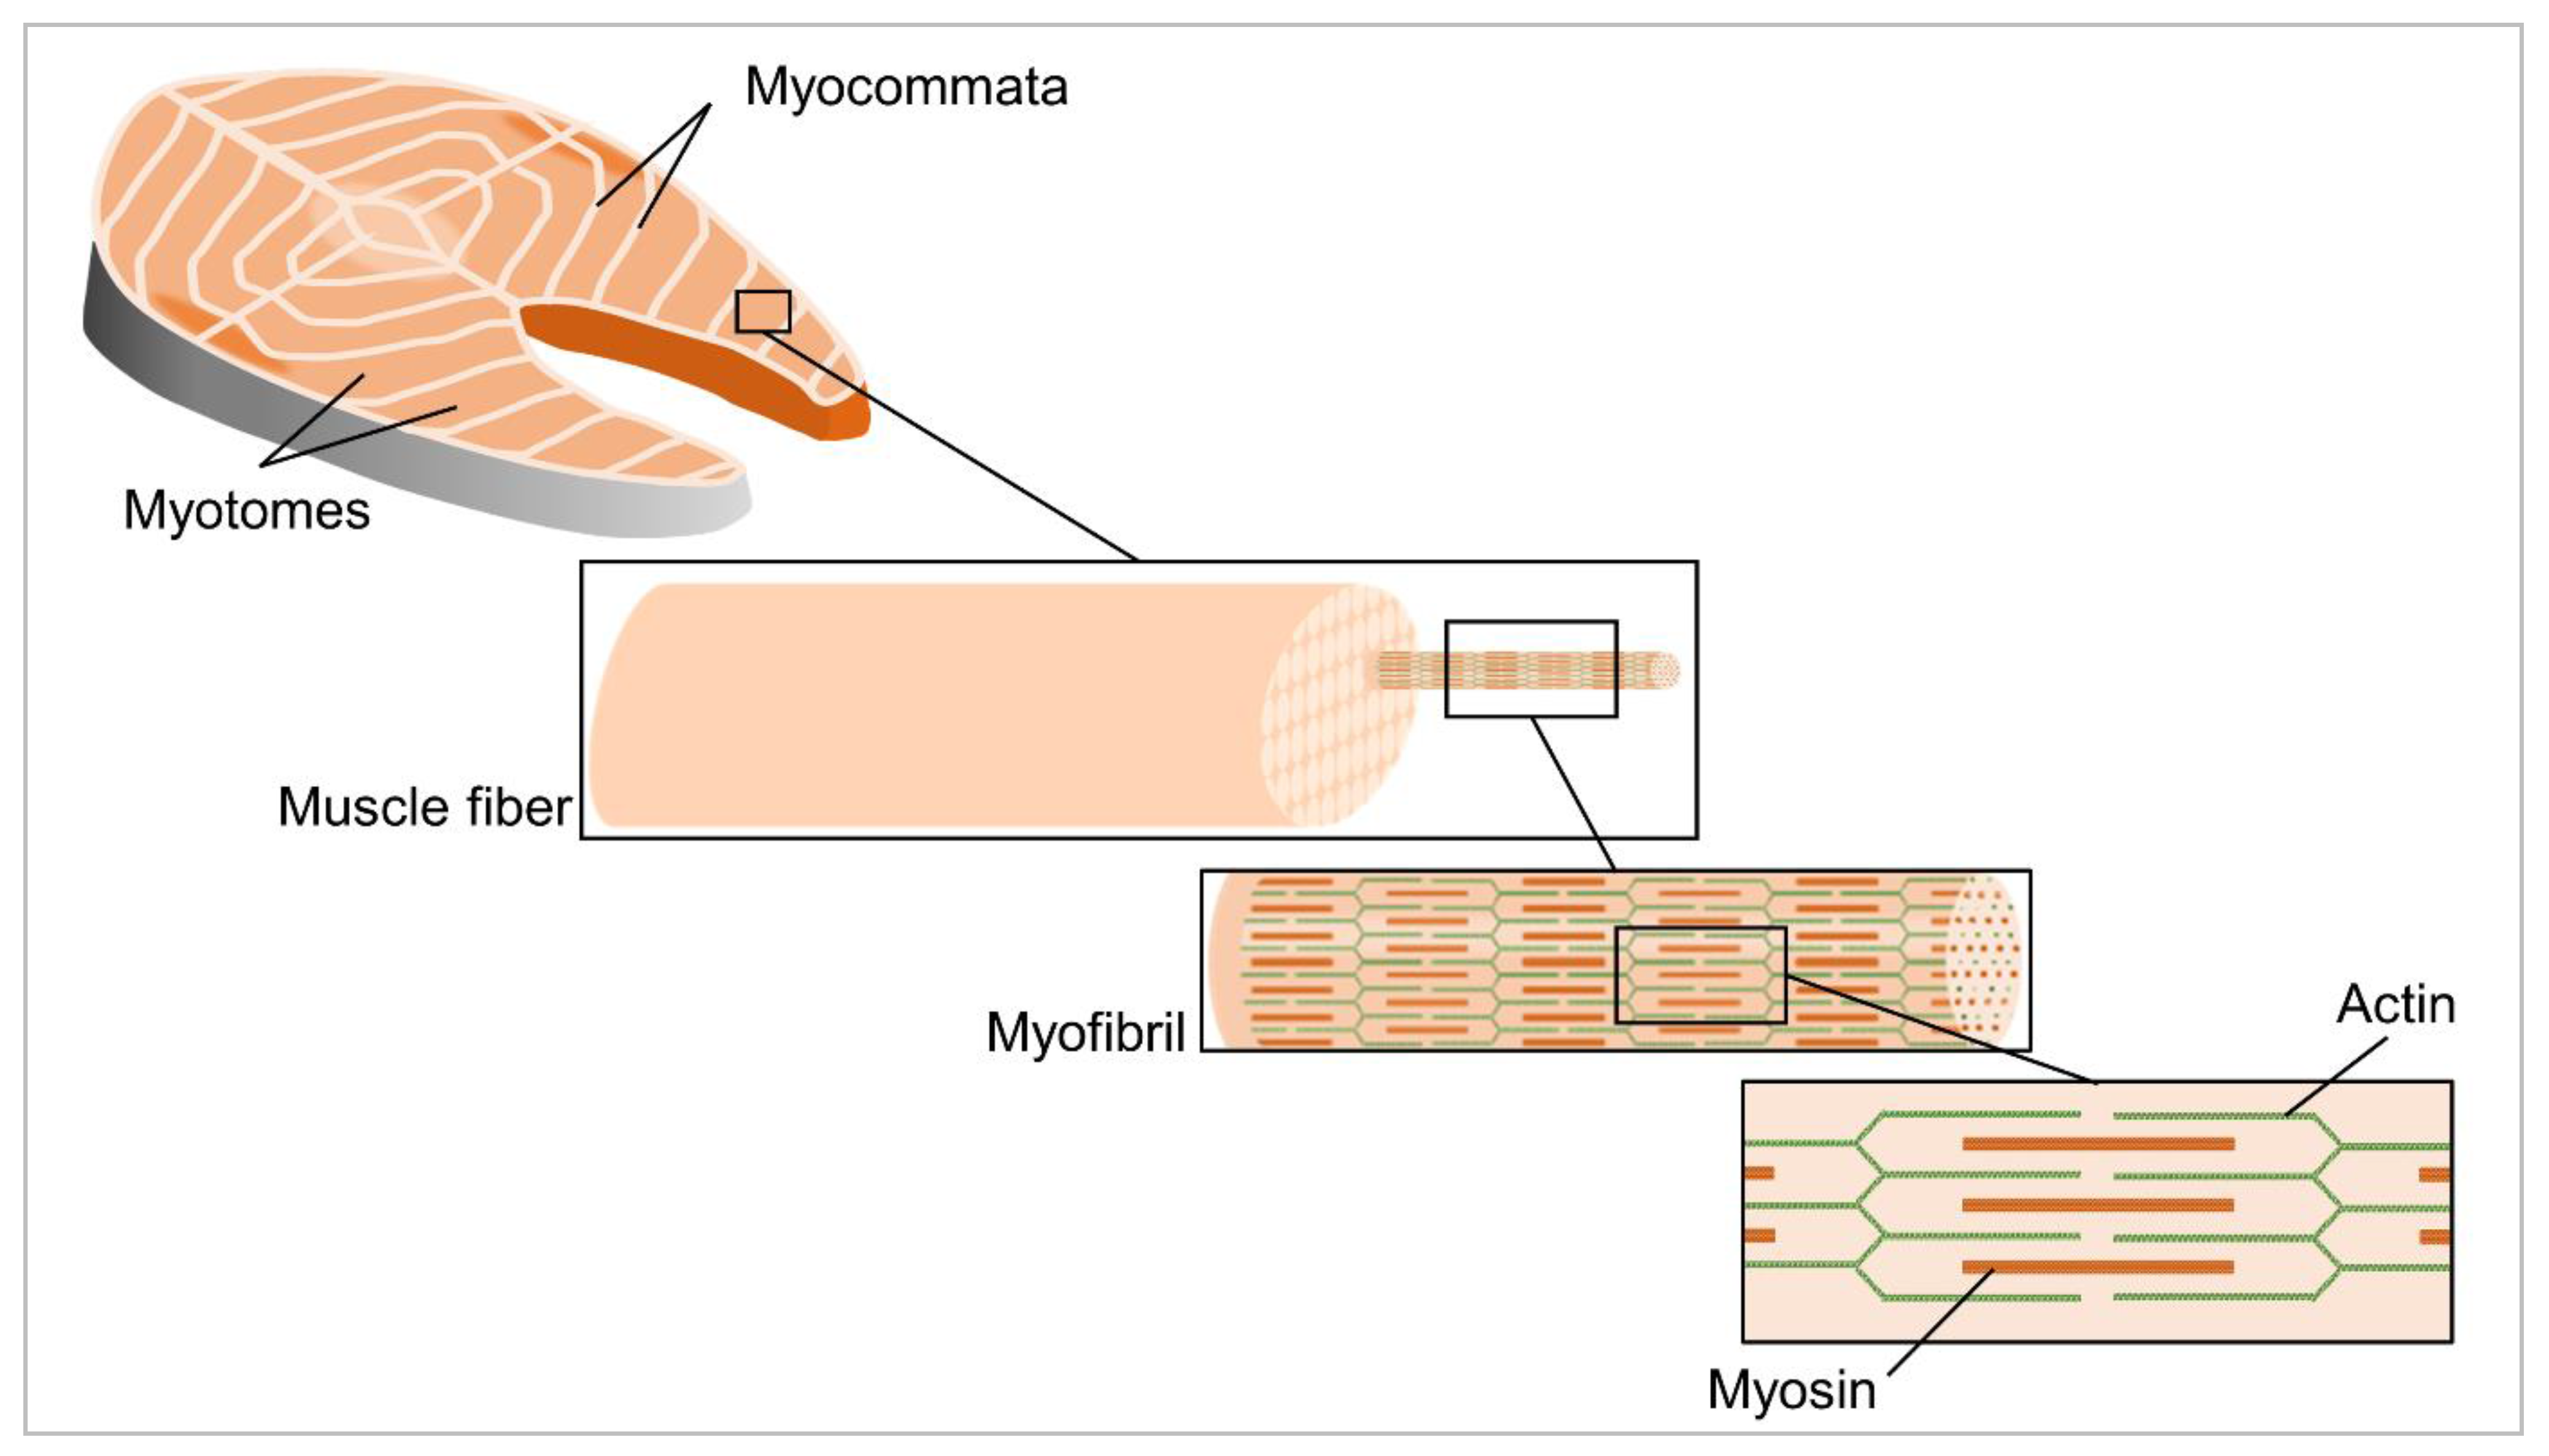
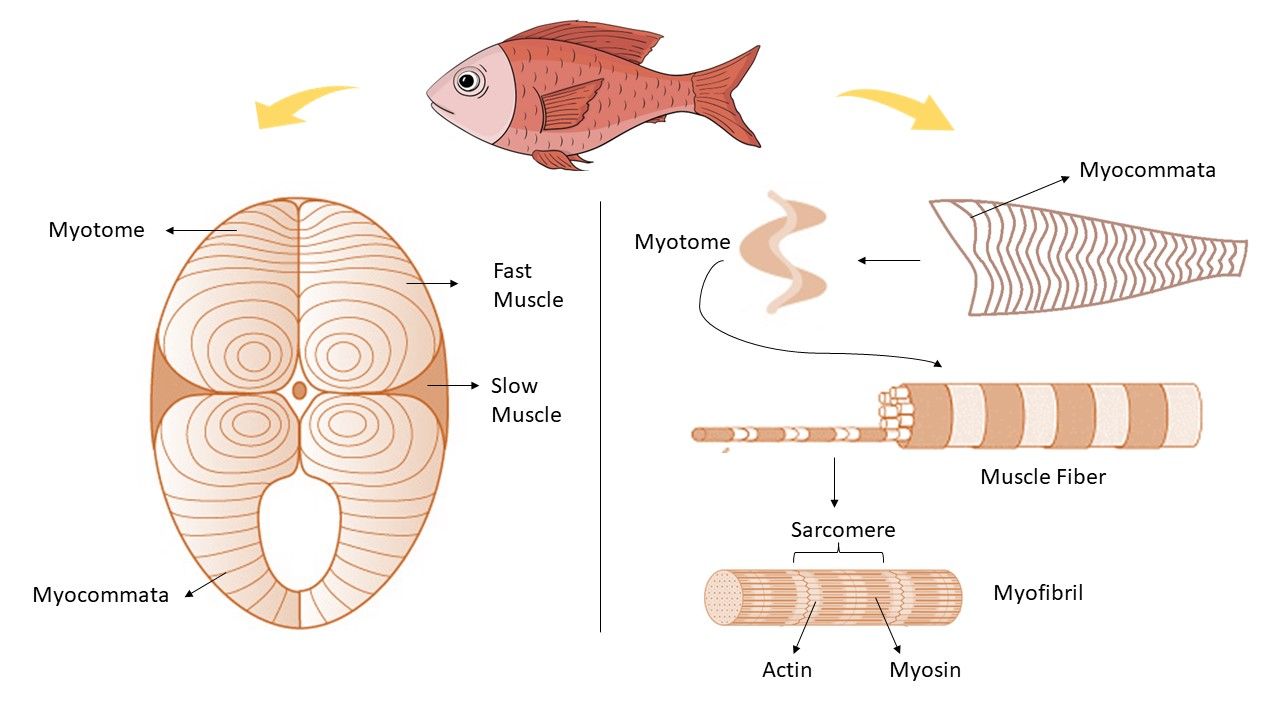
Inside the salmon is muscle which is made of protein. (That's why fish is a good source of protein for us.)
Zoom into the muscle to the molecules that make it up:
https://www.mdpi.com/molecules/molecules-26-01559/article_deploy/html/i…
or https://edis.ifas.ufl.edu/image/FS454/Dtxd3vzk72/Ijalvp6fin/Ijalvp6fin-…
(Molecules are tiny tiny particles that make up matter. Too small to see individually, but trillions of them together make up everything areound us.)
Lay out molecule model of protein in a salmon’s body.
The molecule is made up of atoms.
We will look at one atom, the nitrogen, and see how it moves through the food web.
Find the nitrogen atoms in this protein molecule - the blue atoms. (Blue is the international symbol for a nitrogen atom worldwide.)

The salmon protein first is broken down by bacteria in the soil, into its units.
Break the protein apart and give each student a piece. Ask students to combine their piece with water, as the soil bacteria do. (show image)
The nitrogen atoms are now part of single units of protein (amino acids).
The decomposition does not stop here.
The amino acid breaks apart to form ammonia (show image). Ask students to make a molecule of ammonia from their amino acid.
Ammonia is taken up by plant roots, and is a rich nutrient, allowing our Pacific Northwest trees to grow huge.
Plants get nitrogen from salmon! 3/4 of plant nitrogen in the temperate rainforest is from salmon!

Give students more oxygen atoms so that they can make the other decomposition products, water and carbon dioxide (show image).
Make these molecules of decomposition using these extra oxygens.

Then if time, free play molecule building.

Grades taught
Gr 2
Gr 3